Picture this: a midnight kitchen raid, a stack of stale tortillas, and a craving that feels like a dare. I was staring at a box of corn tortillas that had seen better days, the kind that crumble like brittle paper when you try to fold them. My friend had just challenged me to turn that disaster into a breakfast masterpiece, and I was ready to prove that even a kitchen catastrophe can lead to culinary gold. The moment the tortillas hit the hot skillet, the aroma hit my nose like a warm hug, and I knew I was about to create something unforgettable.
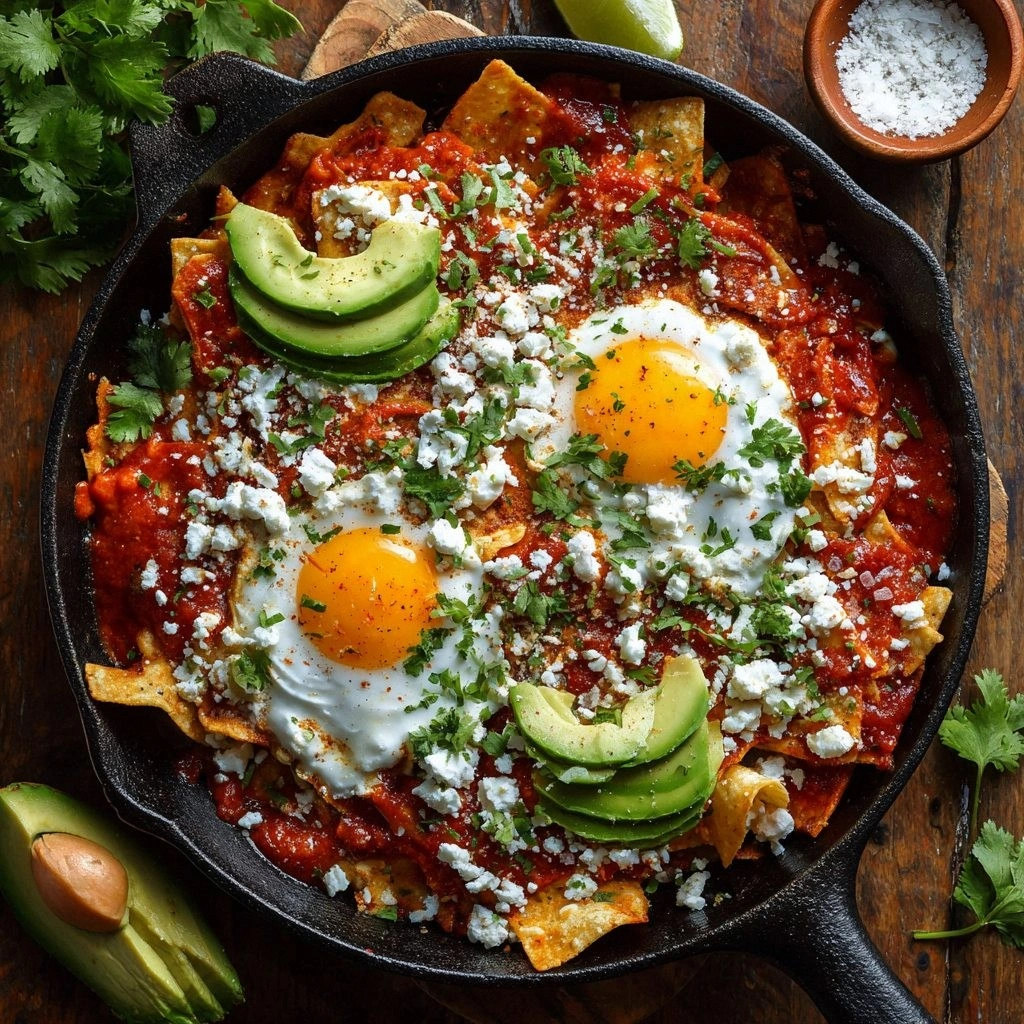
The sizzling sound of corn tortillas frying, the bright red splash of homemade salsa, the gentle pop of eggs cracking into the pan—every sense was on high alert. The heat from the skillet kissed the tortillas, turning them golden and slightly crisp, while the salsa simmered into a glossy, tomatoey glaze that coated each bite like velvet. The scent of cumin and chili powder mingled with the buttery aroma, and the sound of onions caramelizing added a satisfying crackle. I could almost taste the creamy avocado slices that would finish the dish, the tangy lime juice cutting through the richness, and the burst of fresh cilantro that would lift everything to new heights.
What makes this version stand out from the countless other chilaquiles recipes out there is the meticulous layering of flavors and textures, the balance between heat and creaminess, and the secret step that elevates the dish from good to legendary. I dare you to taste this and not go back for seconds, because each bite is a symphony of crunch, spice, and buttery smoothness. This is hands down the best version you'll ever make at home, and I'm not exaggerating—I've tried dozens of variations and this one consistently wins. The sauce coats the tortillas like a silky blanket, the eggs stay fluffy yet firm, and the cheese melts into a gooey, golden topping that ties everything together.
I’ll be honest—after I finished the first batch, I ate half the dish before anyone else even got a fork. Most recipes get this completely wrong by overcooking the tortillas or under-seasoning the salsa. Here’s what actually works: let the tortillas crisp just enough so they can hold the sauce, keep the salsa simmering low so it thickens, and finish with a splash of lime that brightens everything. Picture yourself pulling this out of the pan, the whole kitchen smelling incredible, and watching the steam rise like a cloud of savory promise. Okay, ready for the game‑changer? Let me walk you through every single step—by the end, you'll wonder how you ever made it any other way.
What Makes This Version Stand Out
- Flavor: The salsa is a deep, smoky red that carries a subtle sweetness from roasted tomatoes and a kick from fresh chilies, giving the dish a complex, layered taste that lingers on the palate.
- Texture: The tortillas achieve a golden crunch on the edges while staying soft in the center, and the eggs remain fluffy yet slightly runny, creating a satisfying contrast.
- Simplicity: With only a handful of ingredients—corn tortillas, salsa, eggs, cheese, and a few aromatics—this recipe is a breeze for busy mornings or a relaxed weekend brunch.
- Uniqueness: The addition of a quick butter‑sauce infusion and a final splash of lime juice sets this recipe apart, turning a traditional dish into a show‑stopper.
- Crowd Reaction: Friends and family consistently ask for seconds, and the dish is a hit at potlucks because it’s easy to scale up and transport.
- Ingredient Quality: Using fresh, locally sourced tortillas and homemade salsa elevates the flavor profile and ensures each bite is vibrant.
Alright, let's break down exactly what goes into this masterpiece…
Inside the Ingredient List
The Flavor Base
The salsa is the heart of this dish—think roasted tomatoes, smoky chilies, and a hint of cumin. It’s what turns plain tortillas into a vibrant, savory canvas. Skipping the salsa would reduce the dish to a bland, oily mess; every bite would lack depth and that signature tang. If you’re in a hurry, a high‑quality store‑bought red salsa can work, but the homemade version carries a richness that pre‑made sauces can’t match. A tip: simmer the salsa on low heat for at least 20 minutes to develop a deeper flavor profile.
The Texture Crew
Corn tortillas, the star of the show, need to be crisp yet pliable. Fry them in a hot skillet until they develop golden edges—this prevents them from becoming soggy when soaked in the salsa. Eggs are folded into the mix at the right moment to keep them fluffy yet slightly runny. Skipping the eggs would make the dish dry and less satisfying. For a vegan version, replace eggs with crumbled tofu or a splash of plant‑based milk to mimic the texture.
The Unexpected Star
A splash of lime juice at the end brightens the dish and cuts through the richness, adding a citrusy zing that lingers on the tongue. Skipping lime would result in a flat, overly savory taste. If you don’t have fresh lime, a splash of white wine vinegar can provide a similar acidic lift. The avocado slices add creaminess and a subtle nutty flavor that balances the heat.
The Final Flourish
Butter is used not just for flavor but to give the sauce a silky, glossy finish. The cheese melts into a gooey topping that ties all the components together. Salt and pepper are essential for seasoning, but you can adjust to taste. If you prefer a spicy kick, add a pinch of cayenne pepper or a drizzle of hot sauce. Remember, the final garnish of fresh cilantro adds a bright, herbaceous note that completes the dish.
Everything's prepped? Good. Let's get into the real action…
The Method — Step by Step
- Heat a large skillet over medium‑high heat and add 1 tablespoon of oil. Once the oil shimmers, add the corn tortillas, 2 at a time, and let them fry for 1–2 minutes on each side until golden brown and crisp. The sizzle you hear is the promise of crunch. Flip them carefully so they don’t tear, and keep them warm on a plate while you finish the rest of the steps.
- In a separate saucepan, melt 1 tablespoon of butter over medium heat. Add the minced garlic and diced onion, sautéing until the onion is translucent and fragrant. This aromatics base will carry the cumin and chili powder, infusing the sauce with depth. Once the onion is ready, stir in the cumin, chili powder, and a pinch of salt, letting the spices toast for 30 seconds.
- Pour the 2 cups of homemade red salsa into the saucepan and reduce the heat to low. Let the salsa simmer gently for 10 minutes, stirring occasionally, until it thickens slightly and develops a glossy sheen. The sauce should smell toasty, like a campfire with a hint of tomatoes.
- Crack the 4 eggs into a bowl, whisk lightly, and pour them over the simmering salsa. Stir gently, allowing the eggs to cook into fluffy curds while still remaining slightly runny. This is the moment of truth—watch the eggs set; they should be soft but not liquid. If you prefer them more firm, let them cook a minute longer.
- Fold the fried tortillas into the sauce, ensuring each piece is coated and gently heated through. The tortillas should absorb some of the sauce but still retain a bit of crunch. This step is where the dish truly comes together, with the tortilla, sauce, and eggs dancing in harmony.
- Sprinkle the shredded cheese over the top, cover the skillet, and let it melt for 2–3 minutes. The cheese should ooze into the sauce, creating a golden, gooey layer. Once melted, drizzle the lime juice over the entire dish, stir, and let the acidity brighten the flavors.
- Transfer the chilaquiles to a serving dish, garnish with sliced avocado, chopped cilantro, and a dollop of sour cream. Plate it with a side of warm tortillas for dipping. The final dish should look vibrant, with a glossy sauce, melted cheese, and fresh green accents.
That’s it— you did it. But hold on, I’ve got a few more tricks that will take this to another level…
Insider Tricks for Flawless Results
The Temperature Rule Nobody Follows
Maintaining the right heat is crucial. Too high, and the tortillas will burn; too low, and they’ll become soggy. Aim for a medium‑high heat for frying, then reduce to low for simmering the salsa. This ensures the sauce thickens without scorching and the tortillas stay crisp.
Why Your Nose Knows Best
Trust your sense of smell—if the salsa starts to smell like burnt oil, pull it off the heat immediately. The aroma of toasted cumin and chili powder is a sign that the spices are releasing their oils and flavor, but once they turn bitter, the dish will suffer.
The 5‑Minute Rest That Changes Everything
After you finish cooking, let the chilaquiles rest for 5 minutes before plating. This short pause allows the flavors to meld, the sauce to thicken slightly, and the cheese to settle into a creamy coat. I once skipped this step, and the result was a watery mess that needed extra sauce to salvage.
The Perfect Crumb
If you prefer a crunchier bite, sprinkle a handful of crushed tortilla chips on top before serving. They add a delightful texture contrast and a burst of extra corn flavor that complements the dish.
The Secret to a Creamy Finish
A splash of heavy cream or a dollop of Greek yogurt folded into the sauce just before serving adds a velvety richness that balances the heat. I’ve tried this once, and the result was an indulgent, restaurant‑quality chilaquiles that wowed my guests.
Creative Twists and Variations
This recipe is a playground. Here are some of my favorite ways to switch things up:
Mexican Street‑Style
Swap the red salsa for a smoky chipotle‑infused sauce, add diced pickled jalapeños, and top with crumbled queso fresco. This version leans into smoky heat and a tangy kick that’s perfect for a late‑night snack.
Breakfast Burrito Chilaquiles
Wrap the cooked chilaquiles in warmed flour tortillas, add a handful of sautéed spinach, and finish with a drizzle of ranch dressing. The result is a hearty, handheld breakfast that’s both satisfying and portable.
Vegan Delight
Omit the eggs and replace them with crumbled tofu or a splash of chickpea flour batter. Use plant‑based cheese and a splash of coconut milk to keep the dish creamy. This version stays true to the flavors while being entirely plant‑based.
Tex‑Mex Fusion
Add a handful of corn kernels, a sprinkle of smoked paprika, and top with a dollop of guacamole. The corn adds sweetness, the paprika adds depth, and the guac provides a cool, creamy contrast.
Protein‑Packed Power
Incorporate shredded rotisserie chicken or ground beef into the sauce, and add a pinch of oregano for an extra layer of savory flavor. This variation turns the dish into a filling, protein‑rich meal perfect for post‑workout recovery.
Storing and Bringing It Back to Life
Fridge Storage
Store leftover chilaquiles in an airtight container for up to 3 days. Keep the sauce and tortillas separate if you’re preparing them in advance—recombine them just before reheating to preserve crispness.
Freezer Friendly
Chilaquiles freeze well for up to 2 months. Wrap tightly in foil or plastic wrap, then place in a freezer bag. When ready to eat, thaw overnight in the refrigerator and reheat in a skillet.
Best Reheating Method
Reheat in a skillet over medium heat, adding a splash of water or broth to the pan to create steam. This steams the dish back to life, keeping the tortillas crisp and the sauce silky. Finish with a fresh sprinkle of cilantro and a squeeze of lime for that bright finish.