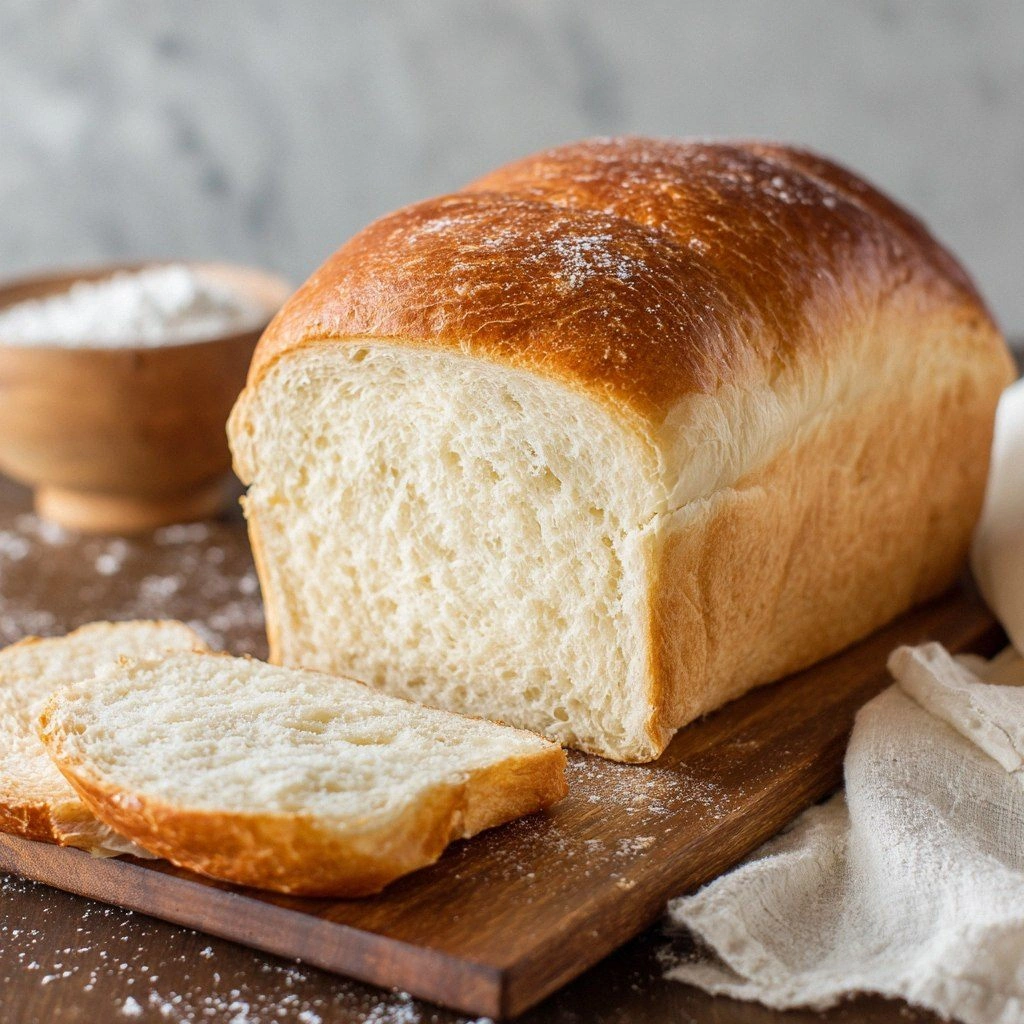
I remember the night I almost burned the house down trying to bake bread. The kitchen was a chaotic mess of flour clouds, a leaking water bottle, and a stubborn loaf that refused to rise. I stared at the dough, my face a mix of frustration and hope, and whispered, “I dare you to taste this and not go back for seconds.” That moment sparked a relentless obsession to craft the most unshakeable, buttery, airy white bread anyone has ever tasted. I spent hours reading, testing, and tweaking, finally arriving at a recipe that feels like a warm hug in loaf form. The aroma that rises from the oven is a promise of comfort, the soft crust a gentle crunch, and the inside a cloud that melts like butter on a summer day. Picture yourself pulling this out of the oven, the whole kitchen smelling incredible, and knowing you just made the best version you’ll ever make at home. Let me walk you through every single step — by the end, you’ll wonder how you ever made it any other way.
What Makes This Version Stand Out
- Flavor: The subtle sweetness from the sugar balances the savory yeast, creating a loaf that tastes like a fresh bakery treat.
- Texture: The dough’s airy crumb and crisp crust come from precise kneading and a short, controlled rise, giving each bite a satisfying contrast.
- Ingredient Quality: Using high-protein bread flour and fresh, active yeast elevates the loaf’s rise and flavor profile.
- Simplicity: Only six ingredients, no fancy add‑ons, making it a quick, reliable go‑to for any kitchen.
- Make‑ahead Potential: The dough can rest overnight in the fridge, allowing flavors to deepen without compromising texture.
- Versatility: It serves as the perfect base for sandwiches, toast, or a simple butter spread, adapting to any meal.
- Time Efficiency: Total prep and cook time is under 45 minutes, ideal for busy mornings or late‑night cravings.
Alright, let's break down exactly what goes into this masterpiece…
Inside the Ingredient List
The Flavor Base
Flour is the backbone of any bread. In this recipe, 2 cups of high‑protein bread flour provide the structure needed for a robust rise. The protein content helps develop gluten, which traps the carbon dioxide bubbles and gives the loaf its airy interior. Skipping flour isn’t an option, but using a lower‑protein flour will result in a denser crumb that feels like a muffin instead of bread.
Salt, a single teaspoon, is not just a seasoning; it strengthens gluten and controls yeast activity. Too much salt can choke the yeast, while too little can lead to a bland loaf. A pinch of salt is also a safety net for those who prefer a milder flavor, but for this version, the full teaspoon is essential to balance the sweetness.
The Texture Crew
Sugar, just a teaspoon, feeds the yeast and encourages a golden crust. It also caramelizes slightly during baking, giving the bread a subtle sweetness that complements the savory base. If you’re on a low‑carb diet, you can replace sugar with a sugar substitute that has a similar volume, but keep in mind the crust may not brown as nicely.
Instant yeast, measured at one teaspoon, is the engine that drives the rise. Fresh yeast can be used, but instant yeast offers a quicker, more reliable fermentation. If you forget to proof your yeast, the dough will still rise, albeit slower, but the flavor may be less complex.
The Unexpected Star
Water, one cup of warm water at 110°F, activates the yeast and hydrates the flour. The temperature is critical: too hot, and you’ll kill the yeast; too cool, and the dough will take forever to rise. Using filtered water removes any chlorine that might impart a bitter taste to the dough.
Butter, two tablespoons, adds richness, tenderness, and a subtle buttery aroma. It coats the gluten strands, making the crumb softer and the crust buttery. If you prefer a lighter loaf, you can substitute butter with olive oil, but the flavor profile will shift toward a Mediterranean note.
Everything's prepped? Good. Let's get into the real action…
The Method — Step by Step
- First, combine the flour, salt, sugar, and instant yeast in a large mixing bowl. Stir until all dry ingredients are evenly distributed. This ensures the yeast is evenly dispersed, preventing any pockets of inactivity. Feel the flour’s texture; it should feel slightly coarse, not powdery.
- Add the warm water and melted butter to the dry mix. Use a wooden spoon or your hand to mix until a shaggy dough forms. The butter should be fully incorporated, giving the dough a slight sheen. At this point, you might notice a faint, yeasty smell that signals life beginning.
- Transfer the dough onto a lightly floured surface and knead for about 8 minutes. The dough should become smooth and elastic, pulling away from your fingers. If it’s still tacky, add a pinch more flour, but be careful not to over‑dampen it.
- Place the dough in a greased bowl, cover with a damp towel, and let it rise for 45 minutes. During this period, the dough should double in size, forming a bubble on its surface. This rise is critical for the loaf’s airy crumb. If your kitchen is cooler, give it an extra 15 minutes.
- After the first rise, gently punch down the dough to release excess gas. Shape it into a tight loaf by folding it over itself several times. This step helps develop the internal structure, ensuring a uniform crumb.
- Place the shaped loaf in a greased loaf pan, cover again, and let it rise for another 25 minutes. The second rise is shorter but equally important; it gives the loaf a final lift before baking. You’ll notice the dough puffing up like a balloon.
- Preheat your oven to 375°F (190°C). While the oven heats, make a shallow cut across the top of the loaf. This allows the loaf to expand without cracking, giving you a beautiful, even crust.
- Bake for 30 minutes, or until the crust turns a deep golden brown and the loaf sounds hollow when tapped on the bottom. The aroma will be intoxicating, a mix of toasted wheat and buttery notes. Let the bread cool on a rack for at least 15 minutes before slicing; this allows the crumb to set and the steam to escape.
- Serve warm, or let it cool completely for a fresh, chewy texture. Add a pat of butter or a drizzle of olive oil, and you’ve got a simple yet elegant meal. Remember, the secret is in the rise and the butter’s subtle flavor.
That's it — you did it. But hold on, I've got a few more tricks that'll take this to another level…
Insider Tricks for Flawless Results
The Temperature Rule Nobody Follows
Yeast thrives at 110°F; if your water is too warm, you’ll kill it, leading to a flat loaf. Use a thermometer to ensure precision. A simple test is to stir a pinch of yeast into warm water; if it froths within 5 minutes, you’re good.
Why Your Nose Knows Best
During the second rise, the loaf will emit a sweet, yeasty aroma. If it smells off or sour, the dough may have gone stale or over‑fermented. Trust your nose; a fresh scent means the loaf will rise beautifully.
The 5-Minute Rest That Changes Everything
After shaping, let the loaf rest for 5 minutes before placing it in the pan. This brief pause allows the gluten to relax, preventing the loaf from retracting and ensuring a perfect rise. It’s a small step that makes a huge difference.
The Secret of a Perfect Crumb
If you want a lighter crumb, add a splash of milk or buttermilk to the dough. The dairy proteins help tenderize the gluten, creating a softer interior. Just replace water with an equal volume of milk.
The Power of a Sharp Knife
Slicing the loaf with a serrated bread knife keeps the crumb intact. A dull knife will crush the soft interior, turning a fluffy loaf into a dense slab. Keep your knife sharp and your cuts clean.
Creative Twists and Variations
This recipe is a playground. Here are some of my favorite ways to switch things up:
Herb‑Infused Bread
Add a tablespoon of finely chopped rosemary or thyme to the dough for a fragrant, savory loaf. The herbs mellow during baking, releasing their oils into the crumb. Serve with cheese for a quick appetizer.
Garlic‑Butter Toast
After baking, rub the loaf with a cut garlic clove and drizzle melted butter. The garlic infuses the crust, turning a simple loaf into an irresistible snack. Pair it with a tomato salad for a Mediterranean feel.
Whole‑Wheat Twist
Replace half the bread flour with whole‑wheat flour for added fiber and nutty flavor. The loaf will be denser but still light enough for sandwiches. A pinch of cinnamon can balance the earthiness.
Cheesy Crust
Sprinkle grated Parmesan or cheddar on top before baking. The cheese melts into a golden, savory crust that adds depth. It’s perfect for a quick snack or a side for soup.
Sweet Cinnamon Swirl
Mix 1 tablespoon of brown sugar and 1 teaspoon of cinnamon into the dough. The result is a subtly sweet loaf with a warm spice aroma. Slice for a breakfast treat or a dessert side.
Blueberry Surprise
Fold in a handful of fresh blueberries just before the final rise. The berries burst during baking, adding bursts of sweet-tart flavor. It’s a great way to use leftover fruit.
Storing and Bringing It Back to Life
Fridge Storage
Wrap the cooled loaf tightly in plastic wrap, then place it in an airtight container. It will stay fresh for up to 5 days. The plastic prevents moisture loss, keeping the crust soft and the crumb tender.
Freezer Friendly
Slice the loaf before freezing; this allows you to take out exactly what you need. Store slices in a freezer bag, removing as much air as possible. Thaw at room temperature or toast directly from the freezer for a crisp finish.
Best Reheating Method
Reheat slices in a toaster or oven at 350°F for 5–7 minutes. For a moist interior, wrap the loaf in foil and bake for 10 minutes. Adding a tiny splash of water before reheating steams the loaf back to perfection.