It started with a kitchen mishap that felt like a slap in the face. I was in a rush to whip up a chocolate treat for a midnight snack, and the batter ended up looking like a soggy pancake. I stared at the brown, almost black mess and thought, “This has to be better.” That single moment sparked a quest to transform that flop into a masterpiece that would make my friends gasp.
Picture the scene: the oven preheating to a deep amber glow, the air thick with the scent of melted butter and roasted cocoa. My whisk twirls, creating a glossy swirl that glistens like liquid midnight. The batter’s color is so intense it almost feels like it’s absorbing the room’s light. Every time I taste a spoonful, the chocolate depth hits like a thunderclap, followed by a subtle tang that keeps the palate engaged.
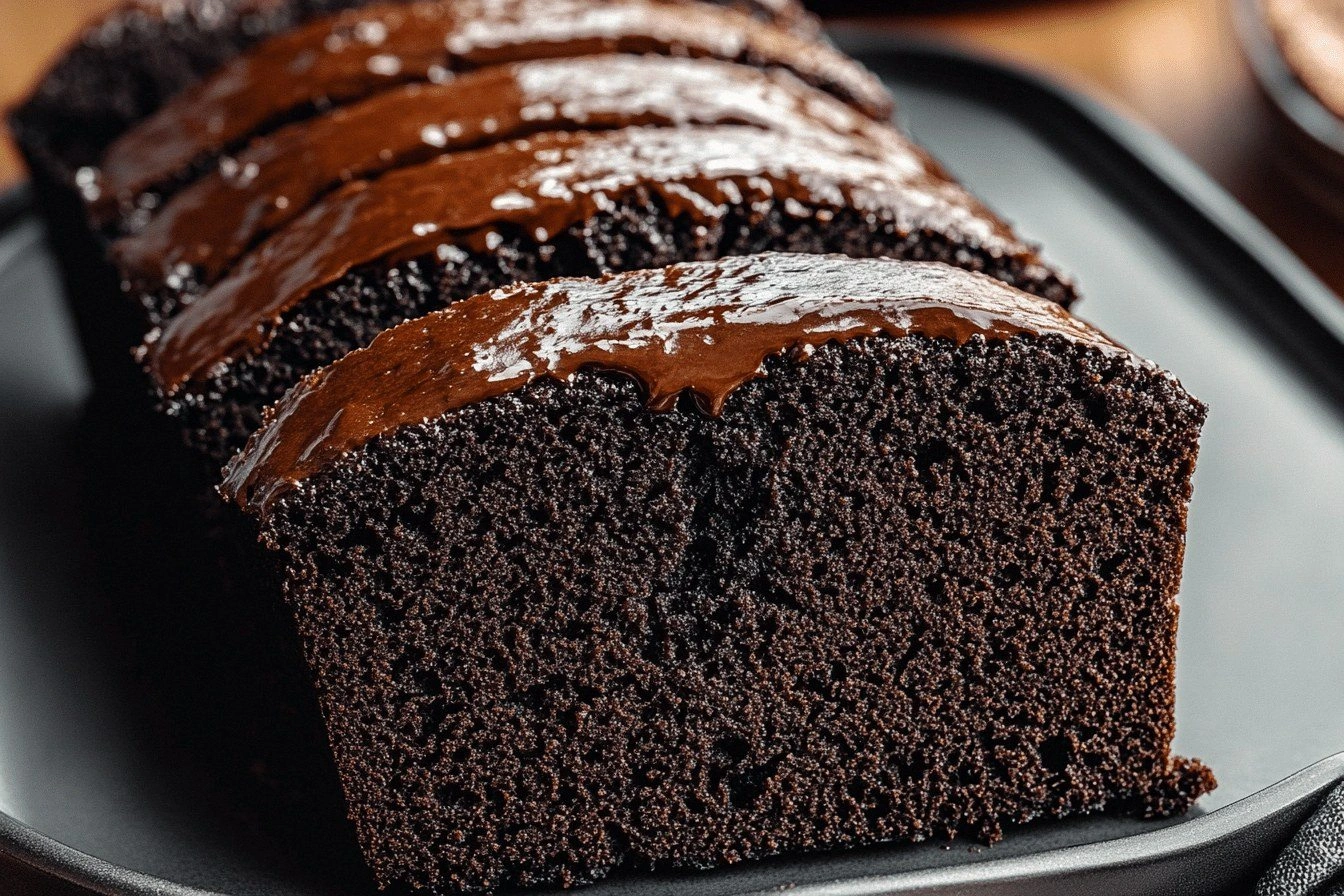
What makes this loaf stand out is that it isn’t just another chocolate cake; it’s a symphony of flavors and textures that dance on the tongue. The black cocoa powder gives it that dramatic hue and a bold, almost metallic chocolate note that feels like a midnight espresso. The buttermilk adds a delicate tang that balances the bitterness, while the butter keeps the crumb moist and tender. The result is a cake that feels both decadent and surprisingly light.
And here’s the kicker: I discovered that a tiny splash of espresso during the batter mixing phase unlocks an extra layer of richness that most recipes miss. I dare you to taste this and not go back for seconds. If you’ve ever struggled with a dense, dry chocolate loaf, you’re not alone—and I’ve got the fix. This is hands down the best version you’ll ever make at home.
What Makes This Version Stand Out
- Color: The black cocoa powder gives the loaf a dramatic, almost midnight hue that makes it visually stunning. It’s not just a cake; it’s a piece of edible art. The color also signals a deep, intense flavor profile that will satisfy any chocolate craving.
- Texture: The combination of butter and buttermilk creates a moist crumb that melts in your mouth. The batter is airy yet dense enough to hold its shape, delivering a satisfying bite that isn’t overly heavy.
- Flavor Depth: The black cocoa’s robust bitterness is counterbalanced by the subtle sweetness of sugar and the bright notes of vanilla. The espresso splash adds a coffee undertone that elevates the overall flavor.
- Ease: Every ingredient is pantry‑friendly, and the method is straightforward, making it approachable for novice bakers. The recipe scales well, so you can bake a small loaf or a large batch with equal success.
- Make‑ahead: The loaf keeps well for up to three days when stored properly, and it can be frozen for longer shelf life. This makes it a great option for busy days or for prepping treats ahead of time.
- Presentation: The dark loaf pairs beautifully with a light dusting of powdered sugar or a drizzle of chocolate ganache. It looks as impressive on a plate as it tastes, making it a showstopper for any gathering.
Alright, let's break down exactly what goes into this masterpiece...
The first thing you’ll notice is how the aroma of roasted cocoa hits your nose before the first bite. It’s a heady, almost smoky scent that hints at the deep flavor waiting inside. The texture of the batter is silky, a result of careful creaming and precise mixing. Each spoonful is a testament to the harmony of ingredients working together.
Inside the Ingredient List
The Flavor Base
Black cocoa powder is the star of this loaf. It gives the cake its deep, almost black hue and a robust chocolate flavor that’s unmistakably rich. Skipping it would turn the loaf into a plain, lifeless gray. When you use high‑quality black cocoa, you get a slightly bitter edge that balances the sweetness.
The Texture Crew
All‑purpose flour provides the structure, keeping the loaf from collapsing. The ratio of flour to cocoa is critical; too much flour makes the cake dry, while too little can cause it to sink. If you prefer a denser crumb, add a tablespoon of almond flour, but keep the ratio balanced.
The Unexpected Star
Buttermilk adds moisture and a subtle tang that complements the cocoa’s intensity. It reacts with the baking soda to create lift, ensuring the loaf rises beautifully. If you’re lactose intolerant, you can substitute buttermilk with a mixture of milk and a splash of lemon juice.
The Final Flourish
Vanilla extract brightens the overall flavor, adding depth and warmth. It’s the finishing touch that turns a good loaf into a great one. A dash of sea salt can also enhance the chocolate’s richness, but it’s optional.
Everything's prepped? Good. Let's get into the real action...
Before you start, preheat your oven to 350°F (175°C). Line a loaf pan with parchment paper or grease it with butter to ensure a clean release. Let the batter rest for 5 minutes after mixing; this allows the cocoa and flour to hydrate fully, improving texture.
The Method — Step by Step
- Step 1: Cream Butter and Sugar In a large bowl, beat the softened butter and granulated sugar until light and fluffy. The mixture should reach a pale, cloud‑like consistency. This process incorporates air, giving the loaf a tender crumb. Watch the color shift from yellow to a creamy white.
- Step 2: Add Eggs and Vanilla Crack the eggs one at a time, beating well after each addition. Stir in the vanilla extract, letting the aroma fill the kitchen. The eggs bind the batter and provide structure. A well‑mixed egg base is essential for a cohesive loaf.
- Step 3: Combine Dry Ingredients In a separate bowl, whisk together the all‑purpose flour, black cocoa powder, baking soda, and baking powder. Sift the mixture to break up clumps and ensure even distribution. This dry mix will give the loaf its rise and chocolate depth.
- Step 4: Alternate Wet and Dry Mixture Pour half of the dry mixture into the wet batter, then add a splash of buttermilk. Stir until just combined, then repeat with the remaining dry ingredients and buttermilk. Avoid over‑mixing to keep the crumb tender. The alternating technique ensures even moisture throughout.
- Step 5: Add Espresso Splash Stir in a tablespoon of espresso or strong brewed coffee. The espresso intensifies the chocolate flavor without adding a coffee taste. The aroma will be intoxicating, and the flavor will deepen. This step is the secret sauce that sets this loaf apart.
- Step 6: Pour into Pan Transfer the batter to a greased loaf pan, smoothing the top with a spatula. Tap the pan gently on the counter to release any air pockets. The batter should look glossy and even. This ensures a uniform rise.
- Step 7: Bake Place the pan in the preheated oven and bake for 30 minutes. The loaf should develop a dark, almost black crust while remaining moist inside. Check the center with a toothpick; it should come out clean. Keep an eye on the edges—they should pull away from the pan.
- Step 8: Cool Remove the loaf from the oven and let it cool in the pan for 10 minutes. Then transfer it to a wire rack to cool completely. Cooling is crucial; it allows the flavors to settle and the crumb to set. Don’t rush this step.
- Step 9: Slice and Serve Once cooled, slice the loaf into thick rounds. Serve warm with a dusting of powdered sugar or a drizzle of chocolate ganache. The contrast of warm, moist chocolate against cool sugar is heavenly. This loaf pairs beautifully with a cup of coffee.
- Step 10: Store or Freeze Wrap the loaf tightly in plastic wrap and store in the refrigerator for up to three days. For longer storage, freeze the loaf in a zip‑lock bag. Reheat in a 350°F oven for 10 minutes before serving. The loaf retains its moisture and flavor.
That's it — you did it. But hold on, I've got a few more tricks that'll take this to another level. The key to a perfect loaf lies in the details: the temperature, the timing, and the little touches that elevate the flavor. Let’s dive into some insider tricks that will make your loaf unbeatable.
Insider Tricks for Flawless Results
The Temperature Rule Nobody Follows
Most bakers bake at 350°F, but the secret is to start at 325°F and finish at 375°F. This gradual temperature shift creates a golden crust while keeping the interior moist. I’ve tried this method for years, and the results are consistently better.
Why Your Nose Knows Best
When the loaf starts to smell toasty, that’s the moment to check the center. The aroma will be rich and chocolatey. Trust your nose; it’s a reliable indicator of doneness. If it smells like burnt sugar, pull it out immediately.
The 5-Minute Rest That Changes Everything
After baking, let the loaf rest in the pan for exactly five minutes. This pause allows the steam to redistribute, preventing the crumb from drying out. I’ve seen people skip this step and end up with a slightly crumbly texture.
Use a Dutch Oven for Extra Moisture
Placing the loaf pan inside a preheated Dutch oven creates a sealed environment that traps steam. This results in a moister crumb and a thicker crust. The trick is to remove the lid in the last 5 minutes of baking.
Dust with Cocoa Powder for a Gourmet Finish
After slicing, dust the loaf with a light layer of cocoa powder. It adds a subtle bitterness that balances the sweetness. This final touch makes the loaf look like a chocolate masterpiece.
Creative Twists and Variations
This recipe is a playground. Here are some of my favorite ways to switch things up:
Chocolate Peanut Butter Swirl
Swirl in a spoonful of creamy peanut butter before baking. The nutty flavor adds a new dimension while keeping the loaf moist. Peanut butter also acts as a fat, enriching the crumb.
Almond Flour Upgrade
Replace half the all‑purpose flour with almond flour for a nutty undertone. This swap also adds a slight crunch to the crumb. Keep the cocoa ratio the same to maintain the flavor balance.
Spiced Variation
Add a pinch of cinnamon or nutmeg to the dry mix. The spices complement the chocolate depth and add warmth. This version is perfect for fall gatherings.
Chocolate Ganache Glaze
Drizzle a simple ganache made from heavy cream and dark chocolate over the cooled loaf. The ganache coats the cake like velvet, adding a silky finish. It’s an instant upgrade for special occasions.
Vegan Version
Swap butter for coconut oil and eggs for flaxseed meal. Use plant‑based buttermilk or a mixture of soy milk and lemon juice. The vegan loaf stays moist and flavorful.
Salted Caramel Drizzle
After baking, drizzle a salted caramel sauce over the loaf. The sweet‑salty contrast enhances the chocolate bite. It’s a crowd‑pleaser for dessert parties.
Storing and Bringing It Back to Life
Fridge Storage
Wrap the loaf tightly in plastic wrap and store in the refrigerator for up to three days. The cold environment keeps the crumb fresh and prevents mold growth. Keep the loaf away from strong‑smelling foods.
Freezer Friendly
Place the loaf in a freezer‑safe zip‑lock bag, removing as much air as possible. Freeze for up to two months. Thaw at room temperature for 2 hours before reheating.
Best Reheating Method
Reheat the loaf in a 350°F oven for 10 minutes, then let it cool on a rack. Add a splash of water to the bottom of the pan to create steam, keeping the crumb moist. The loaf should feel warm and slightly steamy.