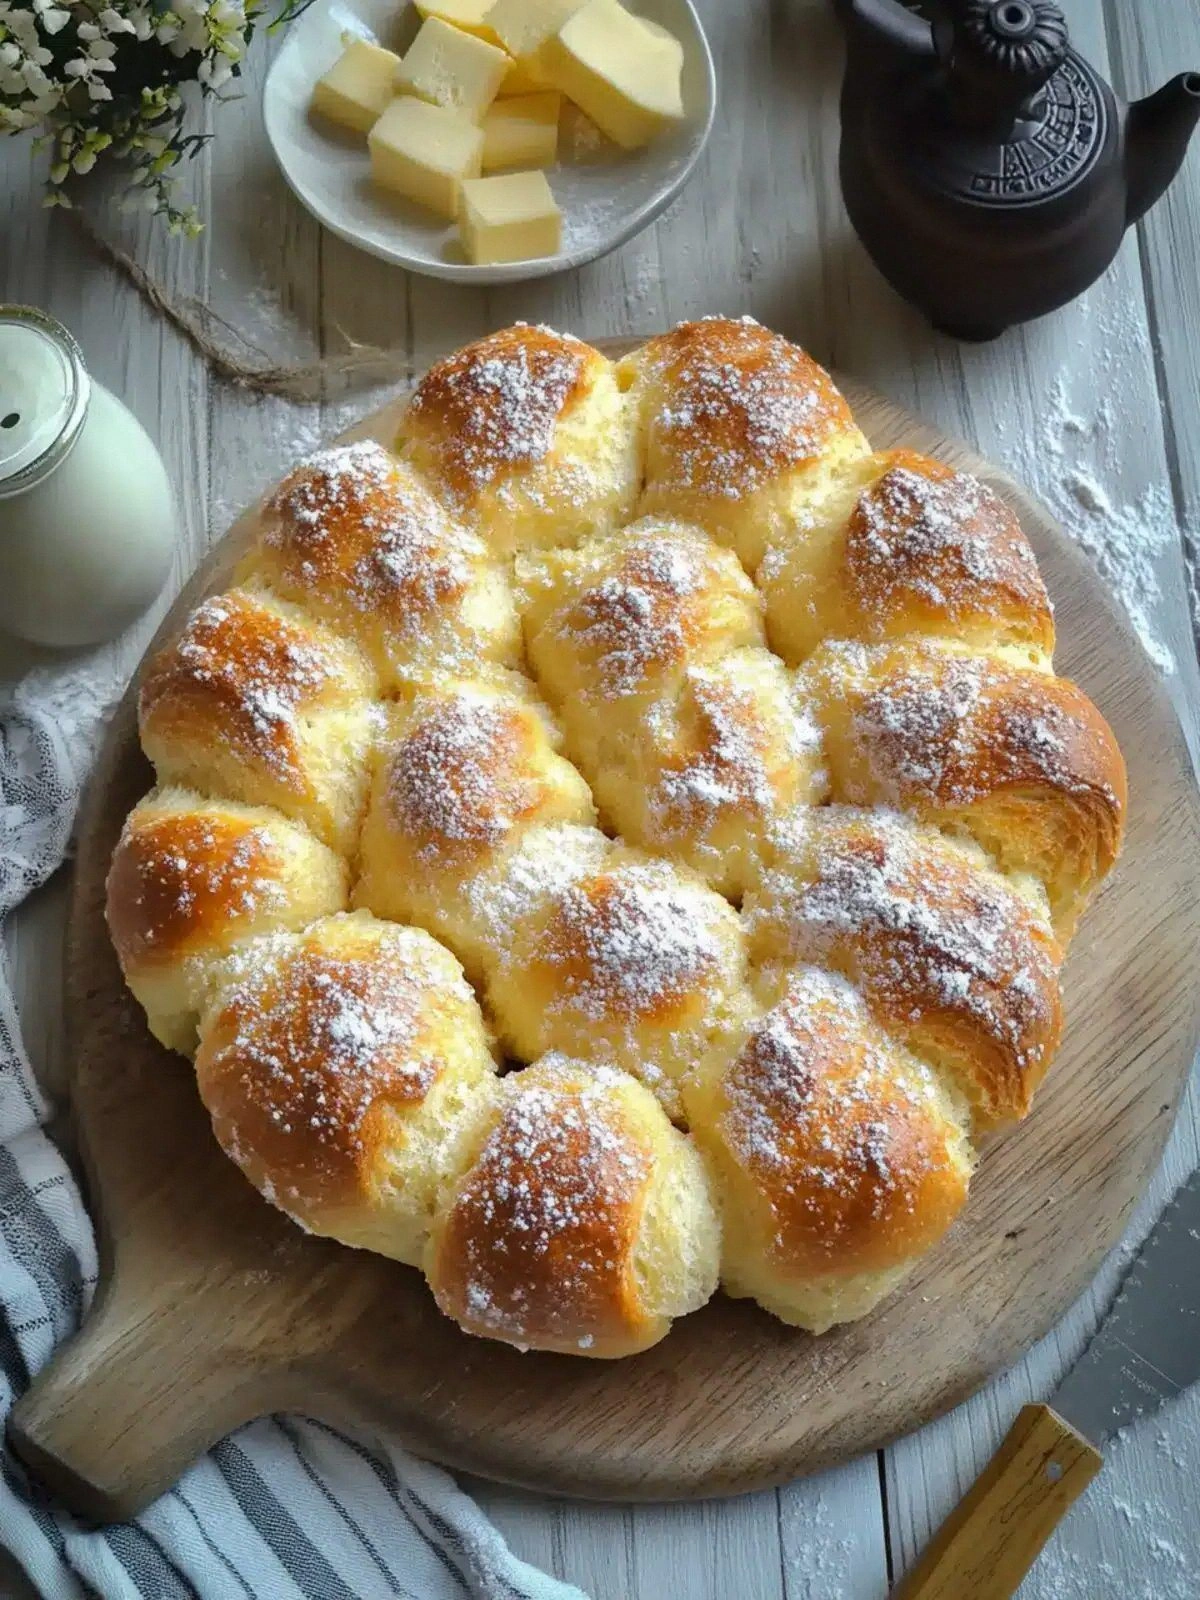
Picture this: a Sunday afternoon, the kitchen clock ticking, and my friend daring me to whip up something that would make the whole house smell like a bakery on a rainy day. I had a stack of flour, a handful of sugar, and a stubborn yeast that had been sitting in the back of the fridge since last month. The result? A glorious, buttery, sugary pull‑apart bread that not only survived the test of time but also became the talk of the neighborhood. I’ll be honest—half the batch vanished before anyone else could even touch it. That’s the kind of kitchen disaster that turns into culinary gold when you’re willing to experiment.
The first bite was a revelation: a golden crust that crackled like fresh snow, a soft, pillowy interior that melted on the tongue, and a sweet, spiced glaze that lingered like a memory of childhood holidays. I could taste the cinnamon dancing with nutmeg, the vanilla whispering through the butter, and the subtle tang of milk that kept everything from feeling greasy. The aroma alone could coax a sleepy cat from the sofa—sweet, buttery, and impossibly inviting. I knew I had stumbled upon something extraordinary, and I couldn’t wait to share every detail of this recipe that will make your kitchen feel like a bakery for the rest of the year.
Why does this version stand out? It’s not just the ingredients; it’s the way they’re layered, the technique that turns a simple loaf into a pull‑apart masterpiece, and the hidden tricks that elevate flavor and texture. Think of it as a symphony where every note—flour, sugar, butter—plays its part with precision. And the best part? The method is straightforward enough that even a kitchen rookie can pull it off, yet it’s sophisticated enough to impress your most discerning friends. I dare you to taste this and not go back for seconds. That’s the power of this recipe.
This isn’t just another “bread” recipe. It’s a testament to the magic that happens when you combine the right ingredients, a little patience, and a dash of confidence. By the end of this guide, you’ll wonder how you ever baked anything else. Let’s dive in and uncover the secrets that make this buttery sugar pull‑apart bread the ultimate homemade treat.
What Makes This Version Stand Out
- Flavor: The blend of cinnamon, nutmeg, and vanilla creates a warm, aromatic profile that feels like a hug from the inside.
- Texture: The crumb is airy yet buttery, with a crisp crust that snaps pleasantly when you break it apart.
- Simplicity: Despite the indulgent taste, the recipe requires only a handful of pantry staples and a single pan.
- Uniqueness: The pull‑apart technique turns a single loaf into individual servings, making it perfect for parties or a cozy breakfast.
- Crowd Reaction: Friends who have tried this say they can’t stop reaching for the next bite, and it’s a conversation starter at gatherings.
- Ingredient Quality: Using real butter and fresh whole milk elevates the flavor beyond the usual quick bread.
- Cooking Method: The single-pan bake and the strategic layering of butter and sugar keep the loaf moist and fragrant.
- Make‑Ahead Potential: You can prepare the dough a day ahead, refrigerate, and bake on the day of service for maximum convenience.
Alright, let’s break down exactly what goes into this masterpiece. But first, a quick kitchen hack that will save you time and keep your hands from getting sticky.
Inside the Ingredient List
The Flavor Base
The foundation of this bread is a simple yet powerful combination of flour, sugar, yeast, and salt. The flour provides structure, while the sugar feeds the yeast and adds a subtle sweetness. Salt balances the flavors and strengthens the gluten network. If you skip the yeast, the bread will be flat and dense; the dough won’t rise, and you’ll lose that coveted airy crumb. For a gluten-free version, try a blend of rice and potato starch, but keep in mind the texture will be noticeably different.
The Texture Crew
Butter, milk, water, and eggs are the crew that gives the loaf its luscious mouthfeel. Butter melts into pockets of richness that coat every bite. Whole milk adds depth and a slight tang, while water helps hydrate the dough. Eggs bind everything together and provide a tender crumb. If you’re on a dairy-free diet, coconut milk can replace whole milk, and a flaxseed “egg” can replace one of the large eggs. However, the flavor profile will shift toward a nutty undertone.
The Unexpected Star
The sweet glaze is where the magic truly happens. A generous layer of granulated sugar, cinnamon, nutmeg, and browned butter coats the loaf, creating a caramelized, fragrant crust. The sugar’s crystalline structure melts into a glossy glaze that clings to the bread like a sweet, buttery halo. Skipping this step will leave you with a dry, plain loaf that can’t compete with the sensory delight of this glaze. If you’re looking to cut calories, reduce the sugar by a quarter, but be prepared for a less dramatic glaze.
The Final Flourish
The final flourish involves a light dusting of powdered sugar and a drizzle of melted butter, giving the loaf a polished finish and an extra burst of flavor. This step is optional but highly recommended for a show-stopping presentation. If you’re short on time, simply dust the loaf with granulated sugar and let it bake—just be aware it won’t have the same silky glaze. A pinch of sea salt on top can elevate the sweetness and add a subtle crunch.
Everything’s prepped? Good. Let’s get into the real action.
The Method — Step by Step
- Prepare the dough. In a large bowl, whisk together 3 cups all‑purpose flour, 0.25 cup granulated sugar, 2.25 teaspoons active dry yeast, and 0.5 teaspoon salt. In a separate container, combine 1/3 cup whole milk, 0.25 cup water, 56 g butter, and 2 large eggs. Warm the liquid mixture to 110°F (43°C) and pour over the dry ingredients. Mix until a sticky dough forms, then knead on a floured surface for about 5 minutes until smooth and elastic. This step is the foundation of the bread’s structure—don’t rush it.
- First rise. Place the dough in a greased bowl, cover with a damp cloth, and let it rise in a warm spot for 1 hour or until doubled in size. The dough should feel airy and slightly tacky. If your kitchen is drafty, wrap it in a plastic bag to retain heat. This rise is crucial for that fluffy crumb.
- Divide and shape. Punch down the dough to release excess air, then divide it into 8 equal portions. Shape each portion into a smooth ball and place them in a greased 9‑inch square pan, arranging them in a single layer. The spacing is important—too close together and they won’t rise properly. This is the moment where you can decide to add a personal touch by sprinkling a pinch of sea salt on top.
- Second rise. Cover the pan with a clean towel and let the dough rise again for 30 minutes. The dough should puff up slightly, creating a gentle dome on top. This second rise gives the loaf its characteristic pull‑apart texture. While it rises, you can start preparing the glaze.
- Preheat the oven. While the dough is doing its second rise, preheat the oven to 375°F (190°C). A properly preheated oven ensures a crisp crust and even baking. The oven’s heat will also trigger the Maillard reaction, giving the bread its golden color.
- Prepare the glaze. In a small saucepan, melt 56 g of butter over medium heat. Once melted, add 1 cup granulated sugar, 2 teaspoons ground cinnamon, and 0.5 teaspoon ground nutmeg. Stir continuously until the sugar dissolves and the mixture turns a light amber. This glaze will coat the loaf, creating a caramelized, aromatic crust. The aroma alone will make your kitchen feel like a bakery.
- Bake the loaf. Brush the tops of the dough balls with the glaze, then pour the remaining glaze over the pan, ensuring every surface is coated. Bake for 25–30 minutes, or until the bread is golden brown and a toothpick inserted into the center comes out clean. The glaze should have a glossy sheen, and the edges will start pulling away from the pan—this is a sign of perfect baking.
- Cool and serve. Remove the loaf from the oven and let it cool in the pan for 10 minutes, then transfer to a wire rack to cool completely. Once cooled, cut the loaf into individual pieces, and serve warm or at room temperature. The bread will hold its shape, yet each piece will pull apart like a fluffy cloud. Enjoy the sweet, buttery, spicy aroma that lingers long after the last bite.
That’s it—you did it! But hold on, I’ve got a few more tricks that will take this to another level. Keep reading for insider tips that will make your bread even more irresistible.
Insider Tricks for Flawless Results
The Temperature Rule Nobody Follows
Many bakers think any warm spot will do for the first rise, but the ideal temperature is between 80°F and 90°F (27°C to 32°C). If you’re in a cooler climate, set the dough near a warm appliance or use a proofing box. A cooler rise can lead to dense, heavy bread, while an overly hot rise can cause the dough to overproof and collapse. I’ve learned that a gentle, consistent temperature yields the most reliable results.
Why Your Nose Knows Best
When the dough is ready for the second rise, give it a quick sniff. A pleasant, yeasty aroma indicates proper fermentation. If it smells off or sour, the dough may have overproofed or the yeast may be dead. I once used an old yeast packet that had been sitting in a cool pantry for months; the dough didn’t rise, and the bread was flat. Always check the yeast’s expiry date and proof it in warm water before adding.
The 5‑Minute Rest That Changes Everything
After brushing the glaze, let the dough rest for 5 minutes before baking. This short pause allows the glaze to set slightly, preventing it from running off the dough during baking. It also gives the dough a moment to relax, which can improve the final crumb structure. I’ve found this trick reduces the chance of uneven crust.
The Golden Finish
If you want a glossy, caramelized crust, brush the loaf with a beaten egg wash before baking. The egg will give the bread a shiny finish and a slight crunch. For a vegan version, use a tablespoon of melted coconut oil instead. The key is to apply it just before the glaze so the sugar can caramelize properly.
The Final Dust
Once the bread is out of the oven, dust it with powdered sugar while it’s still hot. The sugar will melt slightly, creating a delicate, sweet glaze that clings to the bread. If you prefer a more pronounced glaze, drizzle melted butter over the powdered sugar for an extra buttery finish. The final dust can transform a simple loaf into a showstopper.
Creative Twists and Variations
This recipe is a playground. Here are some of my favorite ways to switch things up:
Apple Cinnamon Swirl
Add chopped apples and a dash of ground allspice to the dough before the first rise. The apples soften during baking, releasing sweet juices that mingle with the cinnamon. Perfect for a fall gathering.
Chocolate Chip Surprise
Fold in a cup of dark chocolate chips into the dough after the first rise. The chocolate melts into pockets of gooey sweetness, making the bread irresistible to kids and adults alike.
Cardamom‑Infused Delight
Replace the cinnamon with 1 teaspoon cardamom and add a pinch of saffron to the glaze. The floral notes give the bread a sophisticated, exotic twist that’s ideal for holiday parties.
Nutty Crunch Variation
Stir in a cup of toasted walnuts or pecans into the dough before shaping. The nuts add a crunchy texture and a nutty aroma that complements the buttery glaze.
Coconut‑Lemon Zest
Add 2 tablespoons of shredded coconut and the zest of one lemon to the dough. The coconut gives a tropical flavor, while the lemon zest brightens the sweet glaze, creating a refreshing contrast.
Gluten‑Free Option
Replace all‑purpose flour with a gluten‑free blend and use xanthan gum to maintain structure. The texture will be slightly denser, but the flavor will remain as delightful as the original.
Storing and Bringing It Back to Life
Fridge Storage
Store the cooled loaf in an airtight container or zip‑top bag at room temperature for up to 3 days. If you want to keep it fresh longer, wrap the loaf in parchment paper before placing it in the fridge. This prevents the bread from drying out and keeps the glaze from hardening.
Freezer Friendly
Slice the loaf before freezing; this allows you to grab a single piece when you’re craving a quick snack. Wrap each slice tightly in plastic wrap, then place them in a freezer bag. The bread will stay good for up to 2 months. When ready, thaw at room temperature or toast for a warm treat.
Best Reheating Method
To revive frozen or stale slices, preheat the oven to 350°F (175°C). Place the slices on a baking sheet and bake for 8–10 minutes, or until warm and slightly crisp. For a quick microwave fix, wrap a slice in a damp paper towel and heat on medium for 20–30 seconds. A tiny splash of water before reheating steams the bread back to perfection, restoring its soft interior.