Chocolate Peanut Butter No-Bake Bars
I still remember the first time I made no-bake bars. It was a hot summer day, and I didn't want to spend hours in the kitchen baking. I stumbled upon a recipe for no-bake bars, and it was love at first bite. The combination of the crunchy base, the creamy peanut butter, and the rich chocolate was absolute perfection.
Over the years, I've experimented with different flavors and ingredients, but the classic combination of chocolate and peanut butter remains my favorite. There's something about the way the flavors meld together that just makes my heart skip a beat. And the best part? These bars are incredibly easy to make, requiring no baking and just a few simple ingredients.
These no-bake bars are perfect for any chocolate and peanut butter lover. They're great for a quick dessert or snack, and they're also perfect for potlucks or parties. The best part is that they can be made ahead of time and stored in the fridge for up to a week, making them a great option for busy people.
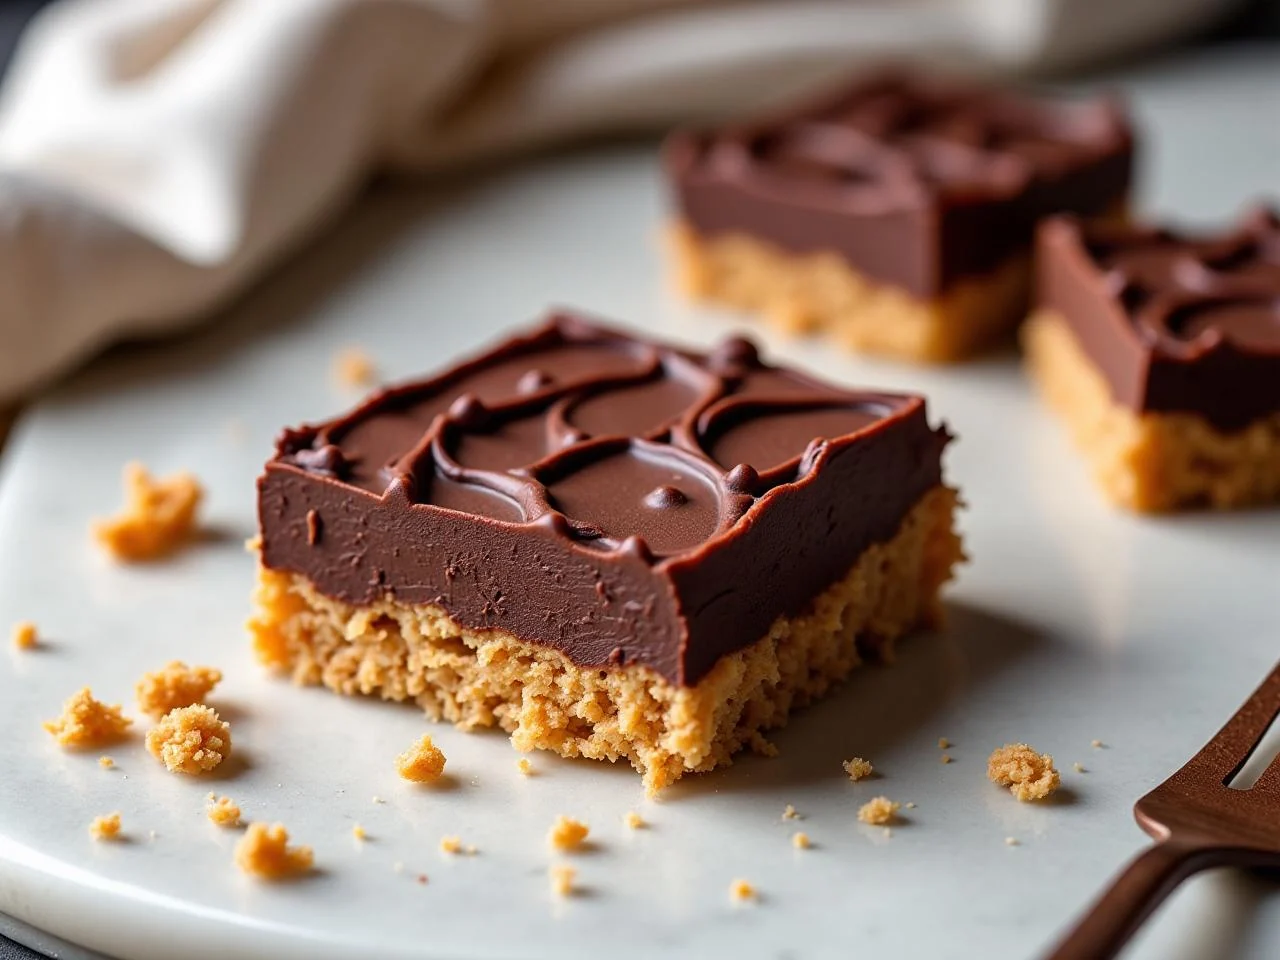
In this recipe, I'll show you how to make the perfect no-bake bars. We'll start with the base, which is made from crushed graham crackers, sugar, and melted butter. Then, we'll move on to the peanut butter layer, which is made from creamy peanut butter, powdered sugar, and a hint of salt. Finally, we'll top it all off with a rich and creamy chocolate layer made from melted chocolate and heavy cream.
So, if you're ready to indulge in some rich and decadent no-bake bars, let's get started. With just a few simple ingredients and some easy-to-follow instructions, you'll be enjoying these delicious treats in no time.
Why You’ll Love This Recipe
- These no-bake bars are incredibly easy to make, requiring no baking and just a few simple ingredients.
- They're perfect for any chocolate and peanut butter lover, with a combination of flavors that will leave you wanting more.
- The bars are great for a quick dessert or snack, and they're also perfect for potlucks or parties.
- They can be made ahead of time and stored in the fridge for up to a week, making them a great option for busy people.
- The combination of the crunchy base, the creamy peanut butter layer, and the rich chocolate layer creates a perfect balance of flavors and textures.
- The bars are visually appealing, with a beautiful layered effect that will impress anyone who tries them.
Why This Recipe Works
The key to making great no-bake bars is to use high-quality ingredients and to follow the instructions carefully. The base of the bars is made from crushed graham crackers, sugar, and melted butter, which provides a crunchy texture and a sweet flavor. The peanut butter layer is made from creamy peanut butter, powdered sugar, and a hint of salt, which adds a rich and creamy texture to the bars.
The chocolate layer is made from melted chocolate and heavy cream, which provides a rich and creamy texture to the bars. The combination of the crunchy base, the creamy peanut butter layer, and the rich chocolate layer creates a perfect balance of flavors and textures that will leave you wanting more.
Another important aspect of making great no-bake bars is to use the right ratio of ingredients. If the base is too thick, the bars will be difficult to cut and will fall apart easily. If the peanut butter layer is too thin, the bars will be too soft and will not hold their shape. And if the chocolate layer is too thick, the bars will be too rich and overpowering.
By following the instructions carefully and using the right ratio of ingredients, you can create no-bake bars that are not only delicious but also visually appealing. The combination of the crunchy base, the creamy peanut butter layer, and the rich chocolate layer creates a beautiful layered effect that will impress anyone who tries them.
Ingredients You’ll Need
To make these delicious no-bake bars, you'll need a few simple ingredients. The base of the bars is made from crushed graham crackers, sugar, and melted butter, while the peanut butter layer is made from creamy peanut butter, powdered sugar, and a hint of salt. The chocolate layer is made from melted chocolate and heavy cream, which provides a rich and creamy texture to the bars.
When shopping for ingredients, make sure to choose high-quality products that will give you the best flavor and texture. For the graham crackers, look for a brand that is crunchy and not too sweet. For the peanut butter, choose a creamy brand that is free from added oils and sugars. And for the chocolate, look for a high-quality brand that is rich and creamy.
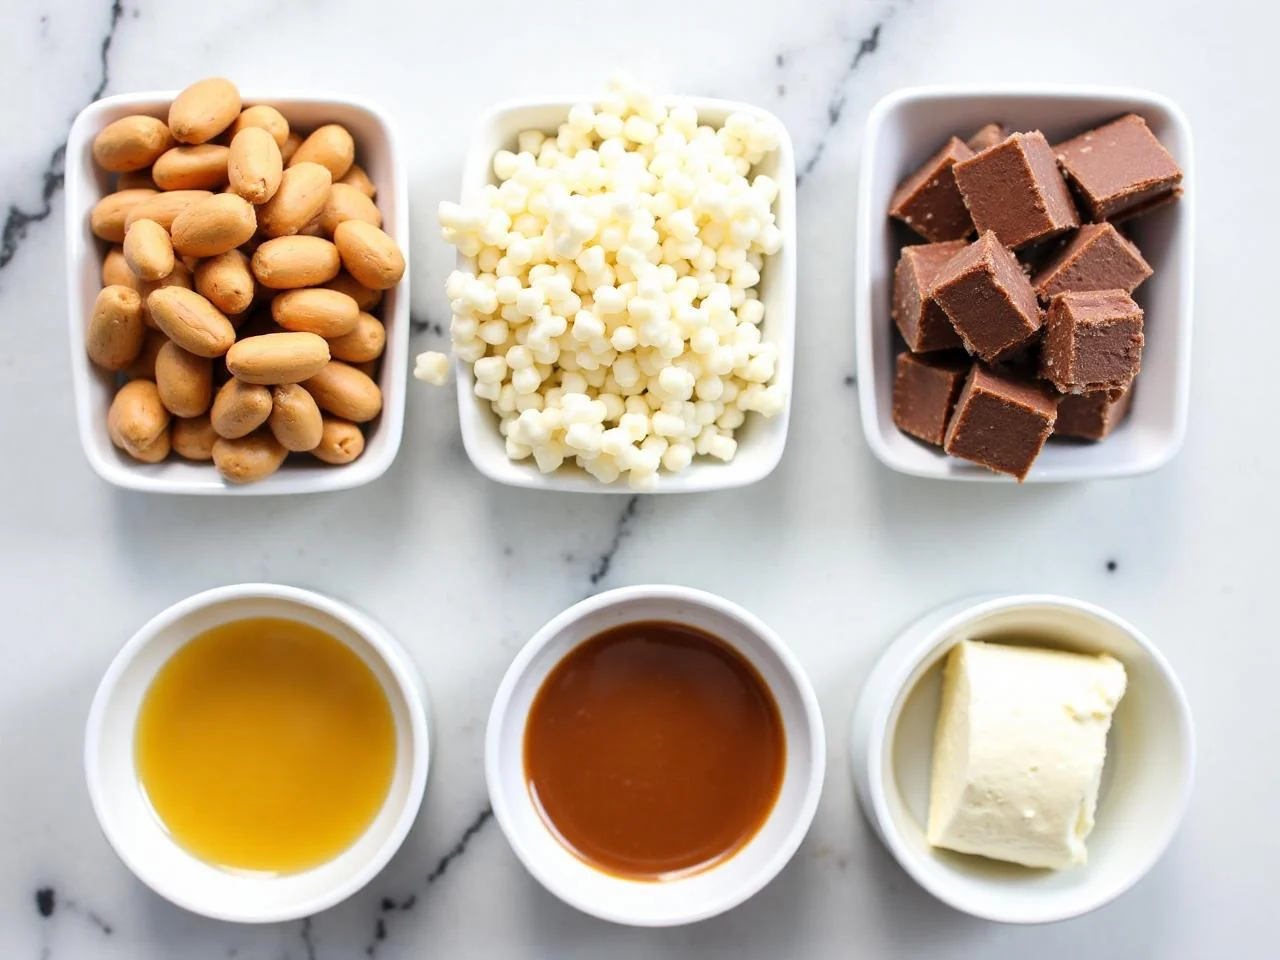
- 1 1/2 cups (190g) graham cracker crumbsThe graham cracker crumbs provide a crunchy texture to the base of the bars. Look for a brand that is crunchy and not too sweet.
- 1/4 cup (50g) granulated sugarThe granulated sugar adds a touch of sweetness to the base of the bars. Use a fine sugar that will dissolve easily.
- 6 tablespoons (84g) unsalted butter, meltedThe melted butter helps to bind the base of the bars together. Use a high-quality brand that is free from added salts and preservatives.
- 1 cup (250g) creamy peanut butterThe creamy peanut butter provides a rich and creamy texture to the peanut butter layer. Choose a brand that is free from added oils and sugars.
- 1/2 cup (100g) powdered sugarThe powdered sugar adds a touch of sweetness to the peanut butter layer. Use a fine sugar that will dissolve easily.
- 1/4 teaspoon fine saltThe fine salt enhances the flavor of the peanut butter layer. Use a high-quality brand that is free from added preservatives.
- 1 cup (200g) semisweet chocolate chipsThe semisweet chocolate chips provide a rich and creamy texture to the chocolate layer. Look for a brand that is high-quality and free from added preservatives.
- 1/2 cup (120g) heavy creamThe heavy cream helps to thin out the chocolate layer and gives it a creamy texture. Use a high-quality brand that is free from added preservatives.
- 1 teaspoon vanilla extractThe vanilla extract enhances the flavor of the chocolate layer. Use a high-quality brand that is free from added preservatives.
- 1/4 cup (30g) chopped peanutsThe chopped peanuts provide a crunchy texture to the top of the bars. Use a high-quality brand that is free from added preservatives.
- 1/4 cup (30g) chocolate shavingsThe chocolate shavings provide a decorative touch to the top of the bars. Use a high-quality brand that is free from added preservatives.
Equipment You’ll Need
How to Make Chocolate Peanut Butter No-Bake Bars
- 1In a large mixing bowl, combine the graham cracker crumbs, sugar, and melted butter. Mix until well combined and the crumbs are evenly moistened.
- 2Press the crumb mixture into the bottom of a 9x9-inch baking dish lined with parchment paper.
- 3In a separate mixing bowl, beat the peanut butter, powdered sugar, and salt until smooth and creamy.
- 4Spread the peanut butter mixture over the crust in the baking dish.
- 5Melt the chocolate chips in a double boiler or in the microwave in 30-second increments, stirring between each interval until smooth.
- 6Stir in the heavy cream and vanilla extract until well combined.
- 7Pour the chocolate mixture over the peanut butter layer in the baking dish.
- 8Refrigerate the bars for at least 4 hours or overnight until set.
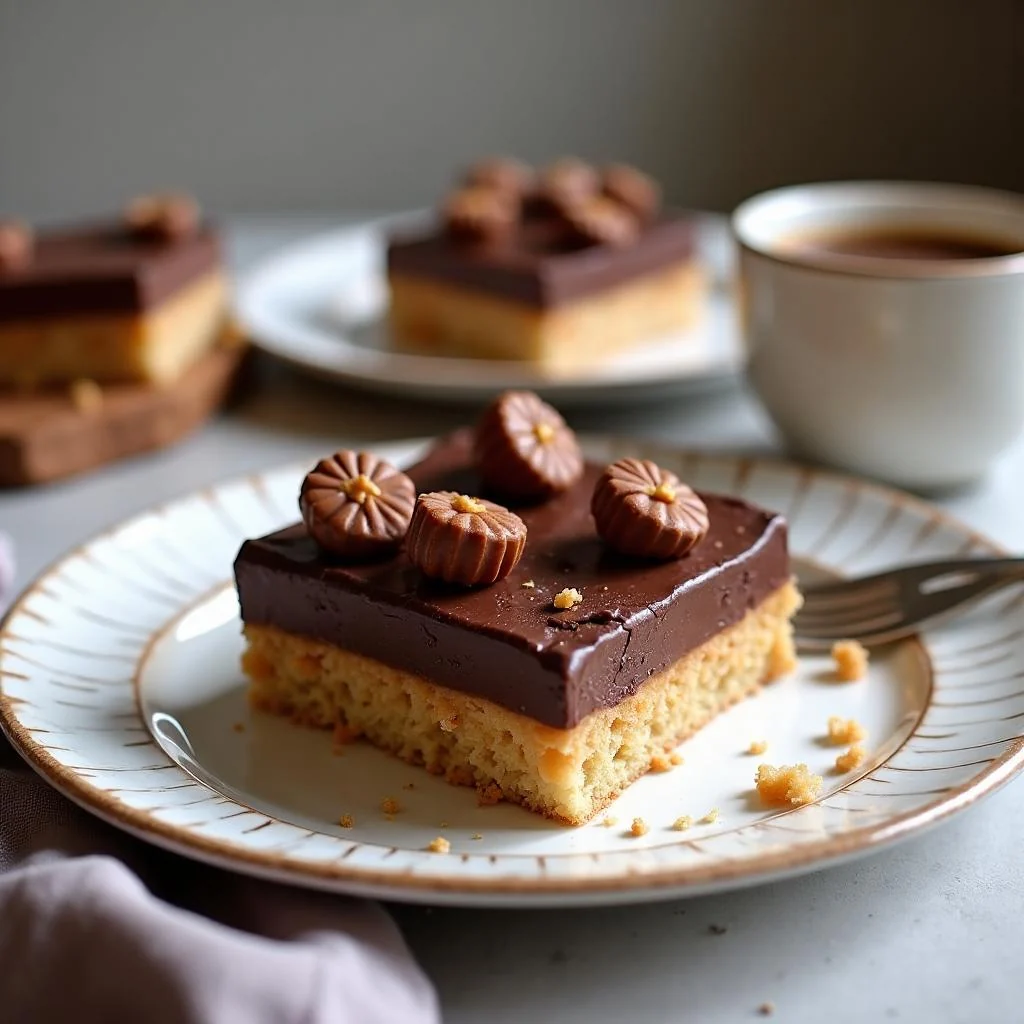
- 9Cut into bars and top with chopped peanuts and chocolate shavings.
- 10Serve chilled and enjoy.
- 11Store any leftover bars in an airtight container in the refrigerator for up to 5 days.
Expert Tips
- To ensure that the bars set properly, make sure to refrigerate them for at least 4 hours or overnight.
- If you find that the chocolate layer is too thick, you can thin it out with a little more heavy cream.
- To get clean cuts, use a sharp knife or cookie cutter and cut the bars when they are chilled.
- If you want a crunchier base, you can bake the crust in a preheated oven at 350°F (180°C) for 10-12 minutes, or until lightly browned.
- To make the bars more decorative, you can top them with chopped nuts or chocolate shavings.
- If you want to make the bars ahead of time, you can prepare the crust and peanut butter layer up to a day in advance, and then assemble and refrigerate the bars on the day of serving.
Common Mistakes to Avoid
- Not pressing the crumb mixture into the baking dish firmly enough, resulting in a loose and crumbly base.
- Not refrigerating the bars for long enough, resulting in a soft and soggy texture.
- Using low-quality chocolate that is too thick and difficult to melt.
- Not stirring the chocolate mixture well enough, resulting in a streaky and uneven texture.
- Cutting the bars when they are not chilled, resulting in a messy and crumbly texture.
- Not storing the bars in an airtight container, resulting in a stale and dry texture.
Variations and Substitutions
- Add a sprinkle of sea salt on top of the bars for a salty and sweet flavor combination.
- Use a different type of nut, such as almonds or hazelnuts, for a different flavor and texture.
- Add a layer of caramel or dulce de leche to the bars for a sweet and gooey texture.
- Use a different type of chocolate, such as white chocolate or milk chocolate, for a different flavor and texture.
- Add a sprinkle of cinnamon or cocoa powder on top of the bars for a warm and spicy flavor.
- Use a different type of cookie or cracker for the base, such as Oreos or wafers, for a different flavor and texture.
- Add a layer of whipped cream or ice cream to the bars for a creamy and indulgent texture.
What to Serve With Chocolate Peanut Butter No-Bake Bars
These no-bake bars are perfect for serving at parties or gatherings. You can cut them into bars or use a cookie cutter to create fun shapes. They're also great for serving as a dessert or snack, and they're perfect for packing in lunchboxes or taking on-the-go.
Some ideas for serving these bars include: serving them with a scoop of ice cream or whipped cream, using them as a base for a sundae, or serving them with a side of fresh fruit or nuts.
Make-Ahead, Storage, Freezing and Reheating
These no-bake bars can be stored in an airtight container in the refrigerator for up to 5 days. They can also be frozen for up to 2 months, and thawed at room temperature when ready to serve.
To freeze the bars, simply place them in a single layer in a freezer-safe container or bag, and store them in the freezer. When you're ready to serve, simply thaw the bars at room temperature or in the refrigerator.
It's also a good idea to label the container or bag with the date and the contents, so you can easily keep track of how long they've been stored.
When storing the bars, make sure to keep them away from strong-smelling foods, as they can absorb odors easily. You should also keep them away from direct sunlight and heat sources, as they can cause the chocolate to melt or become discolored.
Frequently Asked Questions
Can I use a different type of nut butter instead of peanut butter?
Yes, you can use a different type of nut butter, such as almond butter or cashew butter, instead of peanut butter. Just keep in mind that the flavor and texture may be slightly different.
Can I add other ingredients to the peanut butter layer?
Yes, you can add other ingredients to the peanut butter layer, such as honey or maple syrup, to give it a different flavor. Just keep in mind that the texture may be affected.
Can I use a different type of chocolate instead of semisweet?
Yes, you can use a different type of chocolate, such as milk chocolate or white chocolate, instead of semisweet. Just keep in mind that the flavor and texture may be slightly different.
How do I get the bars to set properly?
To get the bars to set properly, make sure to refrigerate them for at least 4 hours or overnight. You can also try freezing them for about 30 minutes to help them set faster.
Can I make these bars ahead of time?
Yes, you can make these bars ahead of time. Simply prepare the crust and peanut butter layer up to a day in advance, and then assemble and refrigerate the bars on the day of serving.
How do I store the bars?
You can store the bars in an airtight container in the refrigerator for up to 5 days. You can also freeze them for up to 2 months, and thaw them at room temperature when ready to serve.
Can I serve the bars at room temperature?
Yes, you can serve the bars at room temperature. However, keep in mind that they may be slightly softer and more prone to melting than when they are chilled.
Can I customize the bars with different toppings?
Yes, you can customize the bars with different toppings, such as chopped nuts or chocolate shavings. Just keep in mind that the toppings may affect the texture and flavor of the bars.
Ingredients
- 1 1/2 cups (190g) graham cracker crumbs
- 1/4 cup (50g) granulated sugar
- 6 tablespoons (84g) unsalted butter, melted
- 1 cup (250g) creamy peanut butter
- 1/2 cup (100g) powdered sugar
- 1/4 teaspoon fine salt
- 1 cup (200g) semisweet chocolate chips
- 1/2 cup (120g) heavy cream
- 1 teaspoon vanilla extract
- 1/4 cup (30g) chopped peanuts
- 1/4 cup (30g) chocolate shavings
Instructions
- In a large mixing bowl, combine the graham cracker crumbs, sugar, and melted butter. Mix until well combined and the crumbs are evenly moistened.
- Press the crumb mixture into the bottom of a 9x9-inch baking dish lined with parchment paper.
- In a separate mixing bowl, beat the peanut butter, powdered sugar, and salt until smooth and creamy.
- Spread the peanut butter mixture over the crust in the baking dish.
- Melt the chocolate chips in a double boiler or in the microwave in 30-second increments, stirring between each interval until smooth.
- Stir in the heavy cream and vanilla extract until well combined.
- Pour the chocolate mixture over the peanut butter layer in the baking dish.
- Refrigerate the bars for at least 4 hours or overnight until set.
- Cut into bars and top with chopped peanuts and chocolate shavings.
- Serve chilled and enjoy.
- Store any leftover bars in an airtight container in the refrigerator for up to 5 days.