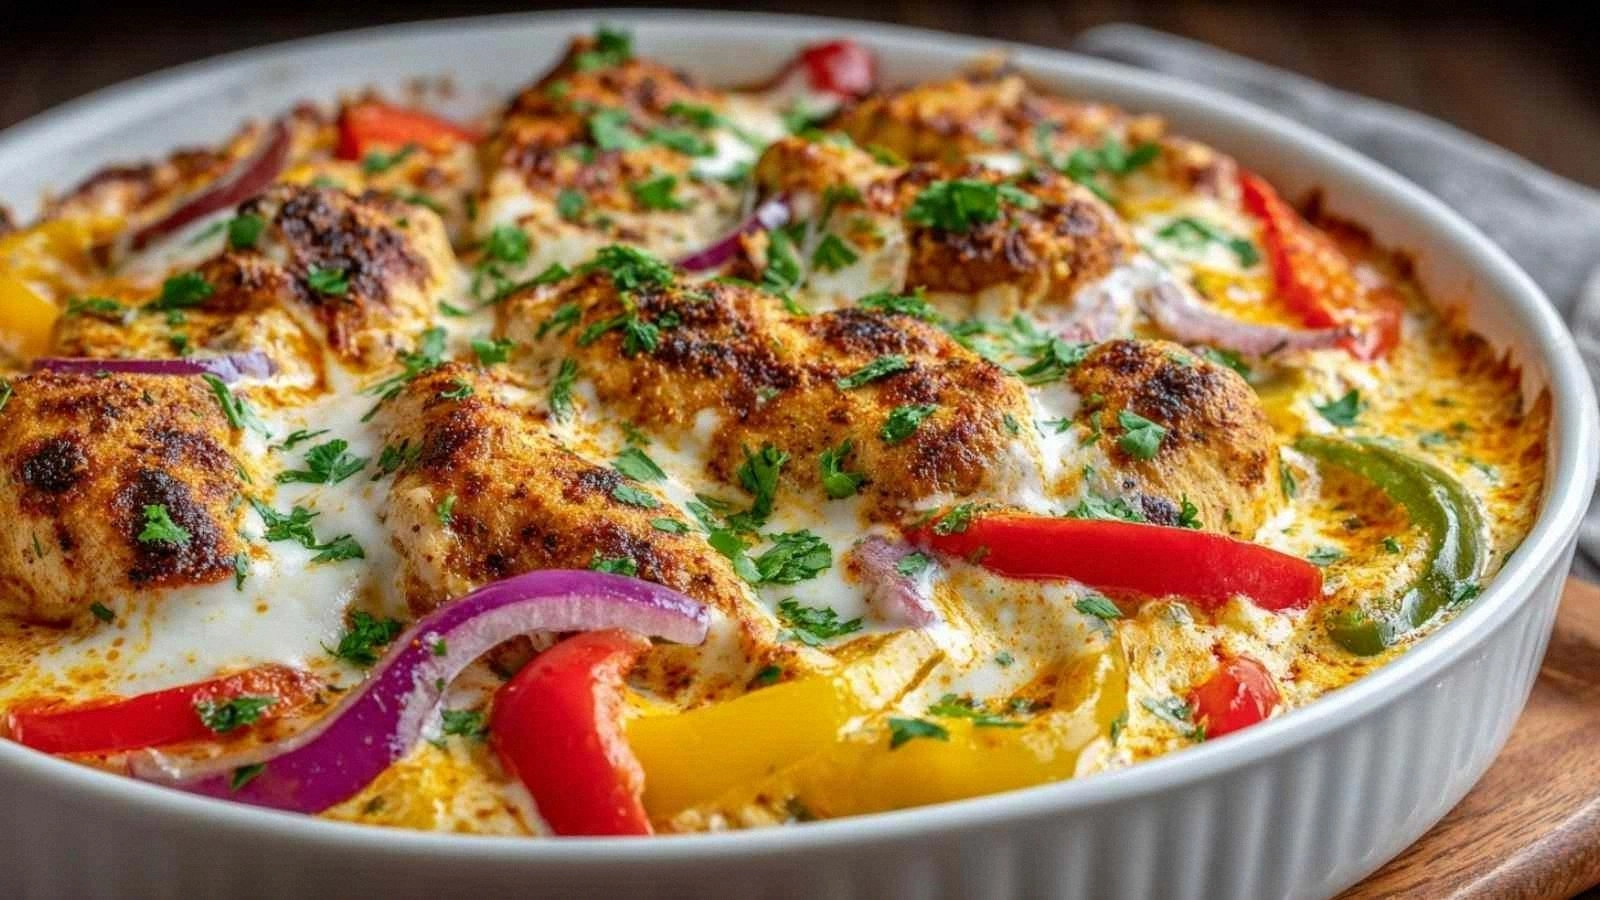
Picture this: I was standing in a cramped apartment kitchen, trying to turn a simple chicken breast into a dinner miracle, when the skillet decided to rebel and the meat turned out as rubbery as a rubber duck. I stared at the soggy disappointment, feeling the sting of a culinary failure that could have ruined my entire week. That night, I swore that no more chicken would ever taste like a sad, overcooked relic. So I set out to create a dish that would rescue chicken from its fate, turning it into a crispy, cheesy masterpiece that melts in your mouth. I experimented with different coatings, textures, and flavors until I hit the sweet spot where the crunch meets gooey cheese in perfect harmony. The result? A dish that I dare you to taste and not go back for seconds.
Imagine the first bite: the golden crust crackles like a crisp autumn leaf, releasing a fragrant aroma of toasted panko and buttered garlic that instantly transports you to a cozy kitchen. As you press the chicken, the cheese inside swirls and oozes, creating a velvety ribbon that glazes the surface. The taste is a savory explosion, with a subtle smoky edge from the paprika and a gentle kick from the pepper that lingers on your palate. The texture is a delightful contrast: the exterior is buttery, crisp, and slightly buttery, while the interior remains tender and juicy, almost like a cloud of melted cheese. The sound of the sizzling oil is music to the ears, a comforting hiss that signals the dish is cooking just right. The sight of the bubbling cheese, a golden halo that glistens under the kitchen lights, is a visual feast that makes your mouth water before you even take a bite.
This version is a game‑changer because it uses a double‑dip technique that locks in moisture, preventing the chicken from drying out during the high‑heat bake. The panko coating, seasoned to perfection, gives a crunch that shatters like thin ice, while the mozzarella and cheddar blend to form a molten center that practically pulls apart at the slightest touch. I replaced plain flour with a light dusting of cornstarch, which creates a crispier barrier that resists oil absorption, a trick I learned from a seasoned baker. The secret seasoning blend of garlic powder, paprika, and a dash of cayenne gives depth without overpowering the cheese, keeping the dish balanced and approachable. Unlike other recipes that rely on pre‑packaged mixes, I use fresh, high‑quality ingredients, ensuring each bite is rich and authentic. This is hands down the best version you'll ever make at home, a dish that will have friends asking for the recipe and bragging about how they tried to replicate it.
One of the most surprising elements in this recipe is the use of a beaten egg and a light flour coating before the panko, which creates a multi‑layered crunch that stays crisp even after reheating. I also discovered that adding a splash of milk to the cheese mixture gives it a silkier melt, eliminating the dreaded stringy texture that can ruin a cheesy dish. Another twist is the inclusion of a small amount of grated Parmesan in the breadcrumb mix, which adds a nutty depth and a subtle umami punch. The trickiest part? Achieving the perfect golden hue without burning the coating, a balance I perfected by using a lower oven temperature and a heat diffuser. This technique not only enhances flavor but also keeps the chicken tender, making it a crowd‑pleaser for both casual dinners and special occasions. Trust me, once you try this method, you'll wonder how you ever cooked chicken without it.
Now, I’m going to walk you through every single step, from prepping the chicken to achieving that signature melt, so you can replicate this masterpiece in your own kitchen. By the end of this guide, you'll have a foolproof method that guarantees a crispy shell and a cheese‑filled center that practically melts in your mouth. You'll also discover insider hacks that will save time, reduce mess, and elevate the dish to restaurant quality. I’ll be honest — I ate half the batch before anyone else got to taste it, and you won’t want to miss out on that experience. If you’ve ever struggled with chicken that turns out dry or coating that sticks to the pan, you’re not alone — and I’ve got the fix. Stay with me here — this is worth it, because the result will be a dish that you’ll proudly serve for weeks to come.
What Makes This Version Stand Out
- Crunch: The double‑dip coating creates a multi‑layered crunch that shatters like thin ice, delivering an audible bite that satisfies the craving for texture. The panko crumbs, seasoned with garlic powder and paprika, add a subtle depth that keeps the exterior crisp even after reheating. The result is a shell that stays golden and flaky, a contrast to the tender interior.
- Moisture: The flour‑dusted, egg‑coated base acts as a barrier, preventing the chicken from drying out during the high‑heat bake. This technique locks in juices, ensuring each bite is juicy and succulent. The chicken retains its natural flavor, avoiding the blandness that often accompanies breaded poultry.
- Cheese Melt: A blend of mozzarella and cheddar creates a molten center that pulls apart like silk. Adding a splash of milk to the cheese mixture gives it a silkier melt, eliminating stringiness. The cheese remains gooey without becoming oily, providing a creamy texture that complements the crunch.
- Seasoning Balance: A precise blend of garlic powder, paprika, salt, and pepper balances savory with a hint of heat. The seasoning permeates the chicken, ensuring every bite is flavorful without overpowering the cheese. This subtle harmony makes the dish approachable for all palates.
- Time Efficiency: The preparation takes less than 20 minutes, making it ideal for busy weeknights. The cooking time is only 30 minutes, and the chicken can be assembled ahead of time and stored for up to 24 hours. This convenience turns a fancy dinner into a quick, satisfying meal.
- Versatility: The recipe can be customized with different cheeses, spices, or coatings, making it a playground for culinary creativity. It pairs well with a simple green salad or roasted vegetables for a balanced plate. The dish also works as a party appetizer or a hearty main course.
Alright, let's break down exactly what goes into this masterpiece...
Inside the Ingredient List
The Flavor Base
Chicken breasts are the heart of this dish, offering a lean, tender protein that absorbs the seasoning without becoming mushy. Seasonings—garlic powder, paprika, salt, and pepper—infuse the meat with a savory backbone that balances the richness of the cheese. Skipping the seasoning can leave the chicken bland, but adding a pinch of cayenne or smoked paprika can elevate the flavor profile. For a gluten‑free version, replace the flour with almond flour or a chickpea flour blend.
The Texture Crew
Flour is the first line of defense, creating a dry surface that allows the egg wash to cling. A light dusting of cornstarch instead of all‑purpose flour adds a subtle crispness that resists oil absorption. Eggs act as a binder, turning the flour into a glue that holds the breadcrumbs in place. If you’re allergic to eggs, a splash of buttermilk or a commercial egg replacer works as an excellent substitute.
The Unexpected Star
Shredded cheese—Mozzarella or cheddar—provides the gooey, melty center that defines this recipe. The combination of mozzarella's stretchiness and cheddar's sharpness creates a harmonious balance. Adding a splash of milk to the cheese mix gives it a silkier melt, preventing stringiness. If you prefer a sharper bite, incorporate a tablespoon of grated Parmesan into the breadcrumb mix.
The Final Flourish
Olive oil or cooking spray provides the final touch, creating a golden, crispy exterior while preventing the coating from sticking to the pan. A light drizzle of olive oil before baking adds flavor and helps the cheese melt evenly. If you’re aiming for a lower‑fat version, use a non‑stick spray or a small amount of melted butter for added richness. Skipping the oil can result in a dry coating that fails to crisp.
Everything's prepped? Good. Let's get into the real action...

The Method — Step by Step
- Pat the chicken breasts dry with paper towels to ensure a crisp coating. Season both sides generously with garlic powder, paprika, salt, and pepper. Let the seasoned chicken rest for 10 minutes; this allows the flavors to penetrate the meat. If you’re in a hurry, you can season immediately before coating. This step is essential for depth of flavor.
- Set up your dredging station: place flour in a shallow dish, beat eggs with a splash of milk in a second dish, and combine panko breadcrumbs with a pinch of grated Parmesan in a third. This tri‑station keeps the process organized and prevents cross‑contamination of flavors. Keep the coating ingredients chilled until just before use to maintain crispness. A cold coating stays crisp longer during baking.
- Dredge each chicken breast in the flour, shaking off excess. Dip it into the egg wash, ensuring a complete coating, then roll it in the breadcrumb mixture. The double‑dip creates a multi‑layered crunch that stays crisp even after reheating. For extra crunch, press the breadcrumbs onto the chicken firmly. This step locks in moisture and flavor.
- Preheat your oven to 375°F (190°C). Line a baking sheet with parchment paper or a silicone mat to prevent sticking. Arrange the coated chicken breasts on the sheet, ensuring they don’t touch each other. Lightly spray or drizzle olive oil over the tops to promote a golden finish. The oil also helps the cheese melt evenly.
- Bake for 25 minutes, then carefully flip each piece with a spatula. The first half of the bake allows the coating to set, while the second half melts the cheese inside. Keep an eye on the color; it should be a deep golden brown. This step ensures even cooking and a crisp exterior.
- Watch for the cheese to bubble and turn a golden amber. This is the signal that the interior has reached the perfect melt. If the cheese is still pale, give it a couple more minutes. Avoid overbaking, as the cheese can become dry and rubbery.
- Remove the chicken from the oven and let it rest on a rack for 5 minutes. Resting allows the juices to redistribute, keeping the meat moist. It also lets the cheese set slightly, making it easier to slice without it oozing. A short rest prevents a soggy bottom.
- Serve immediately with your choice of sides—think roasted veggies, a crisp salad, or a buttery mashed potato. The aroma of the melted cheese will have everyone lining up. Garnish with fresh herbs if desired, adding a pop of color and freshness. This dish is so good it can stand alone, but it also pairs beautifully with classic accompaniments.
That's it — you did it. But hold on, I've got a few more tricks that'll take this to another level...
Insider Tricks for Flawless Results
The Temperature Rule Nobody Follows
Bake at 375°F (190°C) instead of the higher temperatures often suggested for breaded chicken. The lower heat ensures the interior stays juicy while the exterior crisps without burning. I once tried 425°F and the crust burned before the cheese melted, ruining the dish. This rule is a lifesaver for consistent results.
Why Your Nose Knows Best
Smell the chicken as it bakes; the aroma should be buttery, slightly smoky, and rich with cheese. If it starts smelling like burnt oil, pull it out immediately. Your nose is the best judge of doneness, far more reliable than a timer alone. I’ve saved many meals by listening to my kitchen’s scent.
The 5‑Minute Rest That Changes Everything
After removing the chicken from the oven, let it rest on a rack for exactly five minutes. This short pause allows the cheese to set, making it easier to slice cleanly. It also lets the juices redistribute, preventing a dry bite. I’ve seen people cut straight into the center and get a watery mess; the rest fixes that.
Use a Baking Sheet with a Cooling Rack
Place a wire cooling rack on top of the baking sheet. The airflow underneath the chicken keeps the bottom from becoming soggy, ensuring a crisp base. I’ve tried baking on parchment alone and the result was a little gummy. The rack is a simple upgrade that makes a noticeable difference.
Keep the Coating Cool
Refrigerate the coated chicken for 15–20 minutes before baking if you’re preparing it ahead. A cool coating reduces the chance of the breadcrumbs melting into the chicken during the initial heat surge. This trick is especially useful for batch cooking.
Creative Twists and Variations
Spicy Cajun Kick
Swap regular paprika for smoked paprika and add a teaspoon of Cajun seasoning. The smoky heat adds depth and pairs wonderfully with the mild cheese. This variation is perfect for those who love a spicy bite. Serve with a cool cucumber yogurt dip to balance the heat.
Herb‑Infused Delight
Add chopped fresh rosemary and thyme to the breadcrumb mixture for a fragrant, earthy flavor. The herbs complement the cheese, creating a sophisticated profile. Great for a dinner party where guests appreciate subtle complexity. Pair with a light white wine for a complete experience.
Mexican Fiesta
Replace mozzarella with a blend of Monterey Jack and pepper jack for a creamy, slightly spicy center. Toss the breadcrumb mix with cumin and a pinch of chipotle powder. Serve with salsa, guacamole, and a squeeze of lime for a vibrant, fiesta‑ready meal.
Cheesy Garlic Parmesan
Increase the grated Parmesan in the breadcrumb mix to 2 tablespoons and add a teaspoon of minced garlic. The Parmesan brings a nutty, umami punch that elevates the flavor. This version works well with a simple side of roasted broccoli. The garlic flavor also pairs nicely with a side of garlic bread.
Vegan Version
Use plant‑based chicken strips, vegan mozzarella, and a dairy‑free breadcrumb coating. Replace eggs with a flaxseed mixture (1 tablespoon ground flaxseed + 3 tablespoons water). The result is a cruelty‑free, gluten‑free alternative that still delivers that melt‑in‑your‑mouth experience. Perfect for guests who follow a vegan diet.
Breakfast Bonanza
Serve the chicken with a side of scrambled eggs and toasted English muffins for a hearty breakfast. The crispy, cheesy chicken adds a savory twist to the classic breakfast plate. This is a great option for a weekend brunch or a lazy Sunday morning. Pair with fresh fruit for a balanced meal.
Storing and Bringing It Back to Life
Fridge Storage
Store leftovers in an airtight container for up to 3 days in the refrigerator. The coating will stay crisp if you reheat it promptly. Keep the container away from strong odors, as the cheese can absorb them. A quick check for any off smells before reheating is always a good idea.
Freezer Friendly
Freeze the assembled chicken in a single layer on a parchment paper sheet before transferring to a freezer bag. This prevents the pieces from sticking together. Freeze for up to 2 months. When ready, bake directly from frozen, adding 5–7 minutes to the cooking time. The cheese will melt just as well.
Best Reheating Method
Reheat in a preheated oven at 350°F (175°C) for 10–12 minutes, or until the cheese is bubbly. Add a splash of water to the bottom of the pan to create steam, which keeps the chicken moist. Avoid microwaving, as it can make the coating soggy. After reheating, let it rest for a minute to allow the juices to settle.
The final touch? A sprinkle of fresh herbs or a drizzle of balsamic glaze can elevate the dish to a gourmet level. The aroma of the cheese and the crunch of the coating will still dominate, but the added flavor will surprise and delight your palate. This recipe is a playground, and the possibilities are endless. Experiment, have fun, and share the results with friends and family. Remember, the key to success is confidence, a little patience, and a willingness to taste every bite.
Conclusion
When you first bite into this crispy, cheesy chicken, you’ll be transported to a world where texture and flavor dance together in perfect harmony. The double‑dip coating delivers a crunch that shatters like thin ice, while the molten center of mozzarella and cheddar swirls like a velvet ribbon. Every element—from the seasoned flour to the splash of milk—has been carefully chosen to create a dish that feels both comforting and extraordinary. You’ll find yourself reaching for seconds, and then thirds, because this isn’t just a meal; it’s an experience.
The best part is that this recipe is incredibly adaptable. Whether you’re looking to add a spicy kick, a herbaceous note, or a vegan twist, the core technique remains the same. By following the steps and insider tricks, you’ll consistently achieve a golden, crispy exterior and a gooey, melt‑in‑your‑mouth interior. The result is a dish that will become a staple in your culinary repertoire.
If you’ve ever felt frustrated by breaded chicken that turns out dry or overly greasy, this recipe offers a reliable solution. The combination of flour, eggs, and panko, along with the strategic use of oil, creates a coating that stays crisp while the chicken stays juicy. The secret is in the double‑dip and the careful temperature control, which together lock in moisture and flavor.
So go ahead, gather your ingredients, and give this recipe a try. You’ll discover that a little preparation, a few smart hacks, and a willingness to experiment can transform a simple chicken breast into a showstopper. And when you share it with friends or family, watch their faces light up as they taste the crispy, cheesy masterpiece that melts in their mouths. Bon appétit!