Picture this: you’re in the middle of a Sunday brunch, the kitchen is a whirlwind of garlic and citrus, and the clock is ticking. Suddenly, your friend challenges you to turn a simple pantry staple into a show‑stopper. The moment you realize the only thing standing between you and culinary glory is a handful of scallops, a splash of lemon, and a daring dash of garlic‑butter. I was already halfway through a dinner plan when the idea hit—why not elevate scallops to a gourmet level without the fancy fuss? The scent of fresh herbs already mingles with the buttery aroma, and the anticipation is almost as delicious as the dish itself. If you’re ready to turn a quick dinner into a culinary triumph, stick with me, because this is about to get seriously tasty.
I’ll be honest—when I first tried searing scallops, I ended up with a mushy mess that tasted like a soggy sandwich. That disaster taught me the secret sauce of timing and temperature, and it’s the foundation of the version I’m about to reveal. The key is to keep the scallops dry, let the butter caramelize, and finish with a bright lemon finish that cuts through the richness. Picture the scallops sizzling with a golden crust that crackles like a crisp autumn leaf, and the garlic releasing its warm, earthy sweetness. The result? A plate that smells like a sunny seaside breeze, tastes like a buttery kiss, and looks like a masterpiece. I dare you to taste this and not go back for seconds—trust me, you’ll be craving the next batch before it’s even finished.
Most scallop recipes get this completely wrong. They either overcook the fish, under-season the butter, or forget the citrus lift that keeps the dish from feeling heavy. The version I’m sharing fixes every single flaw with one simple technique: a two‑stage sear that locks in the natural juices and a finishing splash of lemon that brightens every bite. I’ve spent countless hours testing different oils, butter ratios, and seasoning blends to find the sweet spot that delivers a tender center with a caramelized edge that shatters like thin ice. The result is hands down the best version you’ll ever make at home, a dish that will have your guests asking for the recipe as soon as they take a bite. Picture yourself pulling this out of the pan, the whole kitchen smelling incredible, and everyone watching in awe as the scallops glisten like polished shells. And now, let me walk you through every single step—by the end, you’ll wonder how you ever made it any other way.
This dish is more than just scallops; it’s a celebration of flavor, texture, and culinary confidence. I’ve combined the buttery richness of a classic pan‑sauté with the bright zing of lemon and the aromatic depth of garlic. The result is a dish that feels indulgent yet effortless, sophisticated yet approachable. If you’ve ever struggled with scallops, you’re not alone—my journey from flopped to flawless has been filled with trial, error, and a few kitchen mishaps that turned into learning moments. But now, with this recipe, you’ll have a foolproof method that guarantees tender, caramelized scallops every time. Ready for the game‑changer? Let’s dive in.
What Makes This Version Stand Out
- Taste: The blend of garlic‑butter and fresh lemon creates a flavor profile that’s both savory and bright, turning ordinary scallops into a gourmet experience. The butter’s slight caramelization adds depth while the lemon’s acidity lifts the dish, preventing it from feeling heavy.
- Texture: A two‑stage sear locks in moisture, giving the scallops a tender center and a crisp, caramelized exterior that crackles like thin ice. The result is a delightful contrast that satisfies every bite.
- Simplicity: With just a handful of pantry staples, you can achieve restaurant‑level flavor in under 45 minutes. No elaborate sauces or complex techniques—just precise timing and a few key ingredients.
- Uniqueness: The finishing splash of lemon zest and juice, combined with a touch of white wine, adds a subtle depth that sets this dish apart from typical garlic‑butter scallops.
- Crowd Reaction: Guests rave about the bright, buttery glaze and the perfectly seared edges. The dish is a conversation starter and a crowd‑pleaser for any gathering.
- Ingredient Quality: Fresh scallops, high‑quality butter, and freshly squeezed lemon juice are the backbone of this recipe. The quality of each component amplifies the overall flavor.
- Cooking Method: The two‑stage sear technique is a game‑changer that ensures consistent results, even for novice cooks.
- Make‑Ahead Potential: The scallops can be pre‑marinated and refrigerated, allowing you to assemble the dish in just minutes when guests arrive.
Alright, let's break down exactly what goes into this masterpiece...
Inside the Ingredient List
The Flavor Base
The foundation of this dish is the garlic‑butter sauce, a silky blend that coats the scallops like velvet. Butter provides richness, while minced garlic infuses warm, earthy tones that complement the delicate seafood. If you skip this step, you’ll lose the depth of flavor that turns the dish from simple to sensational. Swap butter for a high‑smoke‑point oil like grapeseed if you’re avoiding dairy, but keep the garlic to maintain the signature aroma.
The Texture Crew
Dry scallops are essential for a beautiful sear. Use a paper towel to blot them, removing any moisture that would cause the pan to steam. If you’re in a hurry, a quick pat with a clean kitchen towel works just as well. Without this step, the scallops will brown unevenly and develop a rubbery center.
The Unexpected Star
Fresh lemon juice is the bright, acidic counterpoint that cuts through the buttery richness. It also adds a subtle citrus brightness that elevates the entire dish. A pinch of lemon zest adds a fragrant, aromatic layer that enhances the overall experience. If you’re out of lemons, a splash of white wine or a light splash of vinegar can substitute, but the flavor profile will shift slightly.
The Final Flourish
Fresh parsley adds a burst of green that balances the dish visually and flavor-wise. A sprinkle of cracked pepper at the end sharpens the taste, while a pinch of salt ties all the elements together. These final touches transform a good dish into a great one. If you prefer a different herb, basil or cilantro can be used for a distinct twist.
Everything's prepped? Good. Let's get into the real action...
The Method — Step by Step
- Heat a large skillet over medium‑high heat until shimmering. Add the olive oil and let it swirl around the pan, ensuring even coverage. The oil should not smoke; if it does, lower the heat immediately. This first step sets the stage for a perfect sear, and the pan’s temperature will be critical for the next stage.
- Pat the scallops dry with paper towels, then season both sides with salt and a light crack of pepper. A dry surface guarantees a golden crust; any moisture will cause the scallops to steam. Place the scallops in the pan in a single layer, leaving space between each piece. Don’t crowd the pan—crowding lowers the temperature and ruins the sear.
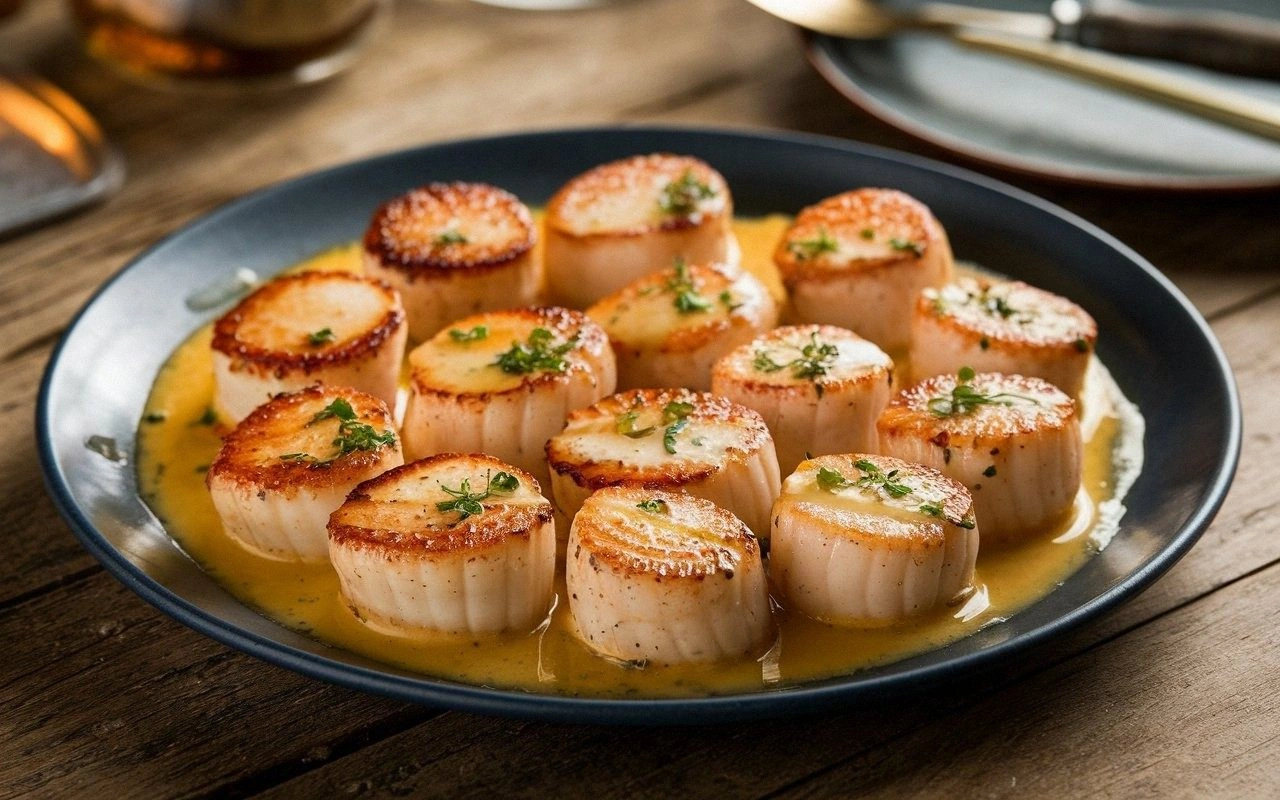
- Sear the scallops for 2–3 minutes on the first side until a deep golden crust forms and the edges start pulling away from the pan. Flip them gently with tongs, and sear the second side for 1–2 minutes. The scallops should still be slightly translucent in the center. This is the moment of truth; the aroma should be buttery and slightly nutty.
- Remove the scallops from the pan and set them aside on a warm plate. Keep them covered loosely with foil to retain heat. While the scallops rest, you’ll create the sauce that will coat them like silk.
- Reduce the heat to medium and add the butter to the same pan. Let it melt fully, then add the minced garlic. Cook for 30–45 seconds until the garlic is fragrant but not browned; burnt garlic will dominate the flavor. The garlic should release a warm, aromatic scent that mingles with the buttery base.
- Add the splash of white wine (or chicken broth if you’re avoiding alcohol). Let it reduce for 1–2 minutes, scraping up any browned bits from the pan. This deglazing step adds depth and a subtle acidity that balances the richness of the butter.
- Return the scallops to the pan, spooning the garlic‑butter sauce over them. Cook for an additional 30 seconds, allowing the sauce to coat each scallop evenly. This final sear locks in the flavors and gives the scallops a glossy finish.
- Remove the pan from heat and stir in the lemon zest, lemon juice, and chopped parsley. The bright citrus will lift the dish, creating a vibrant, aromatic glaze that clings to the scallops. Let the sauce sit for a few seconds before plating, so the flavors meld together.
- Serve immediately over a bed of lightly toasted rice, a simple risotto, or a fresh green salad. The dish’s bright acidity pairs beautifully with the buttery scallops, creating a balanced plate that feels both indulgent and light.
That’s it — you did it. But hold on, I've got a few more tricks that'll take this to another level. From perfect plating to a quick garnish that adds color, these final touches will elevate your dish to restaurant‑grade.
Insider Tricks for Flawless Results
The Temperature Rule Nobody Follows
The pan’s temperature is the secret sauce behind a perfect sear. If it’s too hot, the scallops will burn on the outside and remain raw inside. If it’s too cool, they’ll steam and lose that coveted caramelized crust. I recommend using a thermometer or the water test: drop a few drops of water into the pan; if they sizzle and evaporate instantly, the heat is just right. Maintaining this temperature ensures a tender center and a crisp, golden edge.
Why Your Nose Knows Best
The aroma of garlic and butter is a reliable indicator of progress. When the garlic releases a warm, nutty scent, it’s time to add the wine. If the butter starts to brown and gives off a slight burnt smell, pull the pan off the heat immediately. Your nose is the ultimate chef’s tool—listen to it, and you’ll avoid common pitfalls.
The 5‑Minute Rest That Changes Everything
After searing, let the scallops rest on a warm plate for 2–3 minutes. This brief pause allows the juices to redistribute, ensuring each bite is juicy and flavorful. The sauce will thicken slightly, creating a silky coating that clings to the scallops. Skipping this step can leave the dish feeling dry.
Keep the Pan Clean
Don’t let the pan become a soup of browned bits. After deglazing, scrape the bottom with a wooden spoon to lift all the flavorful residue. This technique maximizes flavor extraction and prevents burnt bits from tainting the sauce.
Fresh Herbs Are a Must
Parsley adds a fresh, herbaceous note that cuts through the richness. If you’re in a pinch, a handful of fresh cilantro or basil can work, but the flavor profile will shift. Use the herbs at the end to preserve their bright color and aroma.
Serve Immediately for Peak Flavor
Scallops are at their best when served hot and fresh. If you need to keep them warm, place them in a low‑heat oven (about 200°F) for 5 minutes. Avoid reheating on the stove, as the residual heat can overcook the delicate flesh.
Creative Twists and Variations
This recipe is a playground. Here are some of my favorite ways to switch things up:
Smoky Chipotle Twist
Add a teaspoon of chipotle powder to the garlic‑butter sauce for a smoky heat that pairs wonderfully with the sweet scallops. The chipotle gives the dish a deep, earthy undertone that contrasts the bright citrus. This version is perfect for a dinner party where you want to wow guests with bold flavors.
Herbed Capers Version
Replace the parsley with capers and a handful of fresh dill for a briny, aromatic lift. The dill’s floral notes complement the scallops’ natural sweetness, while the capers add a tangy pop. This variation is ideal for a Mediterranean‑inspired menu.
Asian Ginger‑Soy Fusion
Swap the butter for a splash of sesame oil, add minced ginger, and finish with a drizzle of soy sauce. The ginger adds a bright, zesty kick, while the soy sauce introduces umami richness. Serve over jasmine rice for a complete Asian‑style dish.
Roasted Tomato Salsa
Top the scallops with a spoonful of roasted tomato salsa for a burst of sweet and acidic flavor. The salsa’s smoky undertone complements the buttery base, creating a layered taste experience. This version is great for a summer dinner with a fresh, garden‑style feel.
Truffle Oil Finish
Drizzle a few drops of truffle oil over the finished dish for an earthy, luxurious finish. The truffle oil adds depth and an indulgent aroma that elevates the simple scallop to gourmet status. Use sparingly, as the truffle flavor is potent and can easily overpower the dish.
White Wine Reduction Variation
Increase the amount of white wine in the sauce and reduce it until it thickens into a glossy glaze. The wine’s acidity balances the buttery richness and adds a subtle fruity note. This variation is perfect for a formal dinner where you want a refined sauce.
Storing and Bringing It Back to Life
Fridge Storage
Store any leftover sauce in an airtight container in the refrigerator for up to 2 days. Keep the scallops separate; they can be reheated gently in a skillet with a splash of water or broth to re‑moisturize. Avoid overcooking when reheating, as scallops can become rubbery.
Freezer Friendly
Freeze cooked scallops in a single layer on a parchment‑lined tray before transferring to a freezer bag. They’ll keep for up to 3 months. When ready to serve, thaw overnight in the refrigerator and reheat in a skillet with a splash of water.
Best Reheating Method
The best way to reheat scallops is to gently warm them in a skillet over low heat, adding a teaspoon of water or broth to create steam. This keeps them moist and prevents drying out. Finish with a light drizzle of the original sauce to restore the buttery glaze.