I was halfway through a midnight snack of stale bread when I realized I had no idea how to salvage a bag of chicken thighs that had been sitting in my fridge for days. The fridge smelled like a forgotten casserole, and I was craving something sweet, garlicky, and comforting. I reached for my Instant Pot, because I knew it could rescue even the most stubborn cuts of meat, and I was about to discover the ultimate version of honey‑garlic chicken. This is not just another recipe; it’s a culinary rescue mission that turns a culinary fluke into a feast. The moment the pot clicked into place, the kitchen transformed into a fragrant laboratory where flavors could mingle and magic could happen.
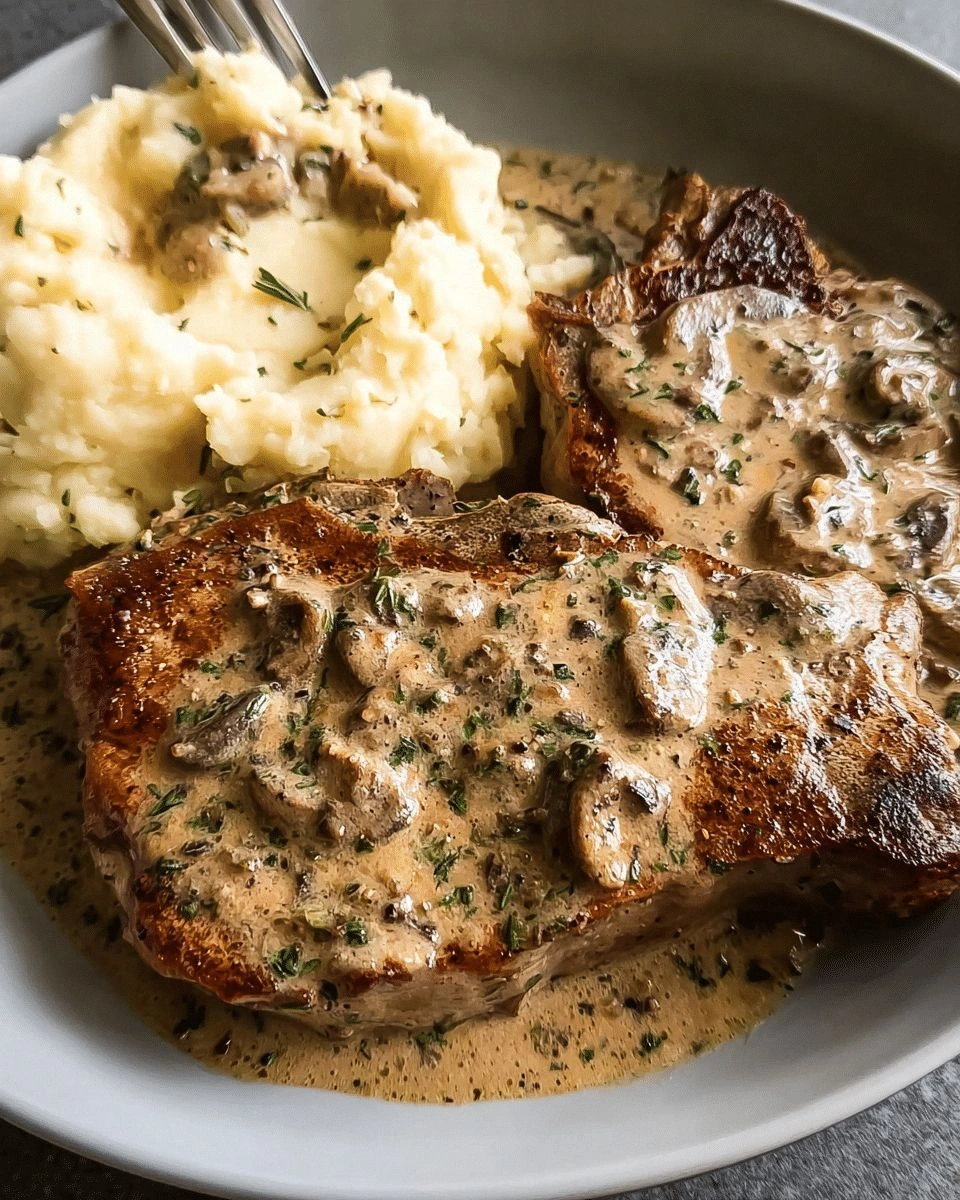
Picture this: the air filling with a caramelized aroma as honey and soy sauce mingle, the sizzling sound of garlic hitting hot oil, and the sight of chicken thighs browning to a golden sheen. The texture of the sauce thickens into a glossy glaze that clings to each piece, while the chicken itself remains juicy and tender. My taste buds were already dancing, and the anticipation of that first bite was almost too much to handle. I dared you to taste this and not go back for seconds, and I’ll be honest, I ate half the batch before anyone else got to try it. The dish was so good that even my cat seemed intrigued, pawing at the steam that rose from the pot.
What sets this version apart is the deliberate layering of flavors and the use of the Instant Pot’s pressure‑cooking prowess to lock in moisture. Instead of a simple pan‑sauté, I first sears the chicken to create a caramelized crust, then deglazes the pot with a honey‑soy mixture that reduces into a velvety sauce. I added a splash of ginger to cut through the sweetness, and finished with a drizzle of sesame oil for a nutty finish. The result is a dish that is hands down the best version you’ll ever make at home, with a sauce that coats the chicken like velvet and edges that shatter like thin ice. This dish feels like a hug in a bowl, a comforting embrace that warms the soul and satisfies the palate.
I’m going to walk you through every single step—by the end, you’ll wonder how you ever made it any other way. From prepping the ingredients to mastering the pressure‑cook cycle, I’ll share the secrets that make this dish shine. If you’ve ever struggled with sticky sauces or unevenly cooked chicken, you’re not alone—and I’ve got the fix. So grab your Instant Pot, let’s dive into the details, and prepare to elevate your comfort‑food game. The kitchen will feel like a stage, and you’ll be the star chef performing a culinary show that dazzles the senses.
What Makes This Version Stand Out
- Taste: The marriage of honey and soy creates a sweet‑savory profile that is both comforting and complex. The garlic provides a punch that cuts through the richness, while a hint of ginger adds a bright, almost citrusy lift. The final sesame drizzle gives a subtle nutty undertone that lingers on the palate.
- Texture: The chicken develops a caramelized crust that is crisp on the outside yet remains tender and juicy inside. The sauce reduces to a silky glaze that coats each piece like a velvet blanket. The contrast between the crunchy edges and the melt‑in‑your‑mouth interior is a sensory delight.
- Simplicity: Despite its sophisticated flavor, the recipe requires only a handful of ingredients and a single appliance. The Instant Pot does the heavy lifting, freeing you from the constant monitoring that plagues stovetop dishes. The result is a hassle‑free meal that feels gourmet.
- Uniqueness: The combination of honey, soy, ginger, and sesame oil creates a flavor profile that stands out from typical chicken recipes. The subtle sweetness is balanced by savory notes, and the aroma is unmistakably appetizing. It’s a dish that you won’t forget.
- Crowd Reaction: Friends and family rave about the depth of flavor and the ease of preparation. Many comment that the dish tastes like a restaurant favorite, but it’s made in a fraction of the time. The dish is a hit at gatherings, and people ask for the recipe repeatedly.
- Ingredient Quality: Using fresh, high‑quality chicken thighs ensures a juicy outcome, while organic honey and soy sauce add depth. The choice of fresh garlic and ginger elevates the dish, and the sesame oil provides a fragrant finish. The ingredient selection is intentional and impactful.
- Cooking Method: The Instant Pot’s pressure‑cook function locks in moisture and flavor, while the sauté mode caramelizes the surface. This two‑step method ensures even cooking and a glossy sauce. It’s a technique that delivers consistency every time.
- Make‑Ahead Potential: The dish can be prepared ahead of time and reheated without losing its flavor. The sauce thickens slightly when cooled, and a splash of water restores its sheen. It’s perfect for busy weeknights or meal‑prep sessions.
Inside the Ingredient List
The Flavor Base
Honey is the sweet backbone of the sauce, providing a natural syrupy texture that thickens as it reduces. The honey’s floral notes contrast beautifully with the umami of soy sauce, creating a balanced sweet‑savory profile that lingers on the tongue. Soy sauce contributes saltiness, depth, and a slightly fermented aroma that enriches the dish. Together, they form a sauce that coats the chicken like velvet and invites a second helping.
Chicken broth is the liquid that brings everything together. It dilutes the sauce just enough to allow the flavors to mingle without becoming watery. The broth also infuses the chicken with a subtle savory undertone that complements the honey. A good quality broth is essential; a low‑sodium version works best if you prefer to control the salt.
The Texture Crew
Boneless skinless chicken thighs are the star of the show, offering a juicy and tender bite that stands up to pressure cooking. Their higher fat content keeps the meat moist, preventing it from drying out during the cooking cycle. Using thighs instead of breasts gives the dish a richer mouthfeel and a more complex flavor profile. They also develop a caramelized crust that adds crunch and visual appeal.
Cornstarch is the optional thickener that turns the sauce into a glossy glaze. When mixed with a small amount of water, it creates a slurry that can be stirred into the sauce during the final sauté. This technique gives the sauce a silky texture that clings to the chicken. If you prefer a thinner sauce, simply omit the cornstarch.
The Unexpected Star
Fresh ginger is the secret weapon that cuts through the sweetness of the honey. Its peppery bite adds a bright, almost citrusy lift that elevates the overall flavor. The ginger also contributes a subtle warmth that makes the dish feel comforting. A small amount goes a long way, so use it sparingly to avoid overpowering the other ingredients.
Sesame oil is the finishing touch that adds a nutty aroma and depth. Its toasted flavor pairs well with the honey and soy, creating a harmonious blend. A drizzle of sesame oil at the end of cooking gives the dish a polished, restaurant‑quality finish. It also adds a subtle sheen to the sauce, making it visually appealing.
The Final Flourish
Garlic is the classic aromatics that provide depth and complexity. The minced garlic releases its oils during the sauté, infusing the pot with a rich, savory aroma. When combined with ginger, it creates a balanced base that supports the sweet‑savory sauce. Garlic also has health benefits, making the dish a wholesome option.
Scallions add a fresh, crisp note that brightens the dish. They provide a subtle onion flavor that balances the richness of the sauce. Sliced scallions also add a pop of color, making the dish more appetizing. They can be added at the end of cooking to preserve their crunch and freshness.
Everything's prepped? Good. Let's get into the real action and bring the flavors to life.
The Method — Step by Step
- Season the chicken thighs with salt and pepper, then set the Instant Pot to sauté mode and heat olive oil over medium‑high heat. Place the chicken skin‑side down and brown for 3‑4 minutes, allowing a golden crust to form. Flip the pieces and brown the other side for another 3 minutes, ensuring even caramelization. This step locks in flavor and gives the chicken a satisfying crunch. The aroma of browned meat will start to fill the kitchen, signaling that the base is ready. When the chicken is nicely browned, remove it from the pot and set it aside.
- In the same pot, add minced garlic and grated ginger, sautéing for 30 seconds until fragrant. Stir constantly to prevent burning, as garlic can quickly turn bitter if left unattended. The sizzling sound and aromatic steam will let you know the aromatics are ready to release their essence. This quick sauté builds a flavor foundation for the sauce. The kitchen will smell like a fragrant Asian market, making the cooking experience even more enjoyable.
- Pour in honey, soy sauce, and chicken broth, stirring to combine and scrape any browned bits from the bottom. The deglazing step lifts the caramelized flavor into the liquid, creating a richer sauce. As the mixture begins to bubble, the aroma intensifies, indicating that the sauce is ready to develop. The pot’s inner walls will be coated in a sticky, sweet‑savory mixture that is the heart of the dish. This step is essential for preventing the burn warning and adding depth.
- Place the chicken back into the pot, ensuring it sits in the sauce. Seal the lid and set the Instant Pot to high pressure for 10 minutes. The pressure cooking will tenderize the chicken while infusing it with the sauce’s flavors. The timer will start, and you’ll hear the gentle hissing that signals the cycle is underway. This step is crucial for achieving juicy, tender meat.
- When the cooking time ends, perform a quick release by carefully turning the valve to vent. The pressure should drop rapidly, but be cautious of the steam that may escape. A quick release prevents the chicken from overcooking and keeps the texture moist. The pot’s pressure will decrease in a matter of seconds, giving you a safe and efficient way to finish the dish. This step is often overlooked, but it’s essential for optimal results.
- Switch the Instant Pot back to sauté mode and bring the sauce to a simmer, stirring occasionally. The sauce should reduce and thicken into a glossy glaze that coats the back of a spoon. This final sauté allows the flavors to meld and intensify, creating a sauce that is both sweet and savory. The heat will cause the honey to caramelize slightly, adding depth and complexity. The dish will start to look more appetizing as the sauce thickens.
- If you prefer a thicker sauce, mix the cornstarch with a tablespoon of water to create a slurry. Stir the slurry into the simmering sauce and cook for 2 minutes until thickened. This technique gives the sauce a silky finish that clings to the chicken. The sauce’s viscosity will increase, making it easier to coat each piece evenly. The dish will feel more luxurious with this subtle adjustment.
- Add the sesame oil and sliced scallions, stirring gently to combine. The sesame oil adds a nutty aroma while the scallions bring a fresh crunch. This final touch transforms the dish from simple to spectacular. The sauce will now have a layered flavor profile that is both comforting and sophisticated. The scallions add a pop of color that makes the dish more appetizing.
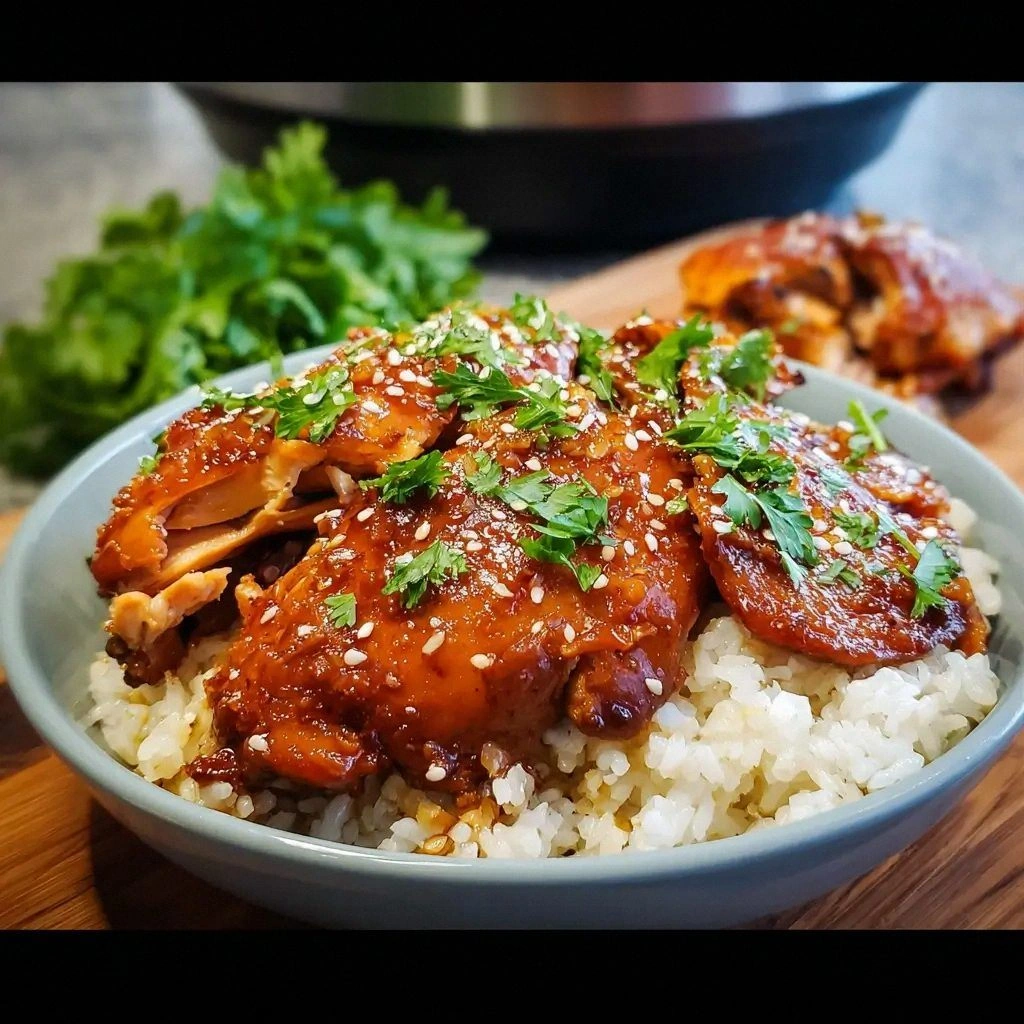
- Transfer the chicken to a serving platter and drizzle the remaining sauce over the top. The glossy glaze will make the dish look as good as it tastes. Garnish with additional scallions if desired, and serve hot over steamed rice or noodles. The dish pairs wonderfully with a crisp green salad or steamed veggies. Enjoy the harmony of sweet, savory, and aromatic notes in every bite.
That's it — you did it. But hold on, I've got a few more tricks that'll take this to another level.
Insider Tricks for Flawless Results
The Temperature Rule Nobody Follows
Many home cooks assume that higher heat always yields better caramelization, but the Instant Pot’s sauté mode has a maximum temperature of around 400°F. Keeping the heat at medium‑high prevents the sauce from burning while still achieving a deep caramelized crust. If you notice the sauce beginning to stick, lower the heat slightly and stir more frequently. This subtle adjustment ensures a glossy, non‑burnt glaze that enhances the dish’s appearance and flavor.
Why Your Nose Knows Best
Before you start the pressure cycle, give the pot a quick sniff. A fragrant, sweet‑savory aroma indicates that the honey and soy have begun to meld. If the scent is too sharp, let the sauce simmer a bit longer to mellow the flavors. Your nose is the best judge of whether the sauce has reached the right balance; trust it, and you’ll avoid a dish that’s either too sweet or too salty.
The 5-Minute Rest That Changes Everything
After the pressure release, let the chicken rest for five minutes before serving. This short rest allows the juices to redistribute, preventing them from spilling out when you cut the meat. The result is a juicier bite that feels more luxurious. Many people skip this step, but it’s the difference between a good dish and a great one. The rest also gives the sauce time to thicken slightly, creating a more cohesive glaze.
Don’t Skip the Deglaze
The browned bits at the bottom of the pot are packed with flavor. Skipping the deglaze step means losing that depth, and the sauce will taste flat. Pour the honey‑soy mixture into the pot, stir vigorously, and scrape every browned particle. The resulting sauce will be richer and more complex, elevating the dish from ordinary to extraordinary.
Use Fresh Chicken for Best Texture
Fresh, high‑quality chicken thighs yield the best results. They contain more natural fat, which keeps the meat moist during pressure cooking. If you’re using frozen thighs, thaw them fully before cooking to ensure even cooking. A small investment in quality chicken pays off with a more flavorful, tender dish.
Keep the Sauce Thick, Not Watery
A watery sauce can make the dish feel underwhelming. If the sauce is too thin, add a cornstarch slurry to thicken it. Stir the slurry into the sauce and let it simmer until it reaches the desired consistency. The sauce should coat the back of a spoon without dripping. A thick, glossy glaze enhances the dish’s visual appeal and flavor intensity.
Creative Twists and Variations
This recipe is a playground. Here are some of my favorite ways to switch things up:
Spicy Sriracha Kick
Add a tablespoon of sriracha to the sauce for a fiery twist. The heat balances the sweetness, creating a bold flavor profile that satisfies spice lovers. Serve with a cooling cucumber salad to offset the heat. This variation turns the dish into a spicy, satisfying meal that’s perfect for hot summer nights.
Coconut‑Infused Creaminess
Replace half the chicken broth with coconut milk for a creamy, tropical version. The coconut adds a subtle sweetness that complements the honey, while the creaminess gives the sauce a silky texture. Pair it with jasmine rice for an Asian‑inspired feast that feels like a vacation.
Smoky Chipotle Touch
Stir in a teaspoon of chipotle powder for a smoky, earthy flavor. The chipotle adds depth and a gentle heat that pairs well with the honey. This variation is ideal for those who enjoy a complex, smoky profile in their dishes.
Herb‑Infused Variation
Add a handful of fresh thyme or rosemary during the sauté step for an herbaceous note. The herbs add a fragrant layer that contrasts with the sweet sauce. This variation is great for autumnal meals, bringing a warm, earthy aroma to the table.
Vegetarian Version
Replace the chicken with bite‑size tofu cubes or tempeh. Marinate the protein in the honey‑soy mixture before pressure cooking to absorb the flavors. The tofu will soak up the sauce, creating a vegetarian dish that’s just as satisfying. This version is perfect for plant‑based diners.
Pineapple Twist
Add a cup of diced fresh pineapple during the final sauté for a tropical burst. The pineapple’s natural sweetness enhances the honey, while its acidity balances the richness. The result is a bright, refreshing dish that feels like a beach vacation on a plate.
Storing and Bringing It Back to Life
Fridge Storage
Store the cooled dish in an airtight container in the refrigerator for up to three days. The sauce will thicken slightly as it cools, but it remains flavorful. When reheating, add a splash of water or broth to rehydrate the sauce. This technique restores the glossy finish and keeps the chicken moist.
Freezer Friendly
For longer storage, freeze the dish in freezer‑safe containers for up to two months. Label the container with the date to keep track of freshness. Thaw overnight in the refrigerator before reheating. The dish retains its flavor, and the sauce can be refreshed with a small amount of liquid.
Best Reheating Method
Reheat the dish gently on the stove over low heat, stirring frequently. Add a tablespoon of water or broth to loosen the sauce and prevent it from drying out. The gentle heat will warm the dish evenly without overcooking the chicken. Serve hot, and enjoy the same delicious flavors as when it was first made.