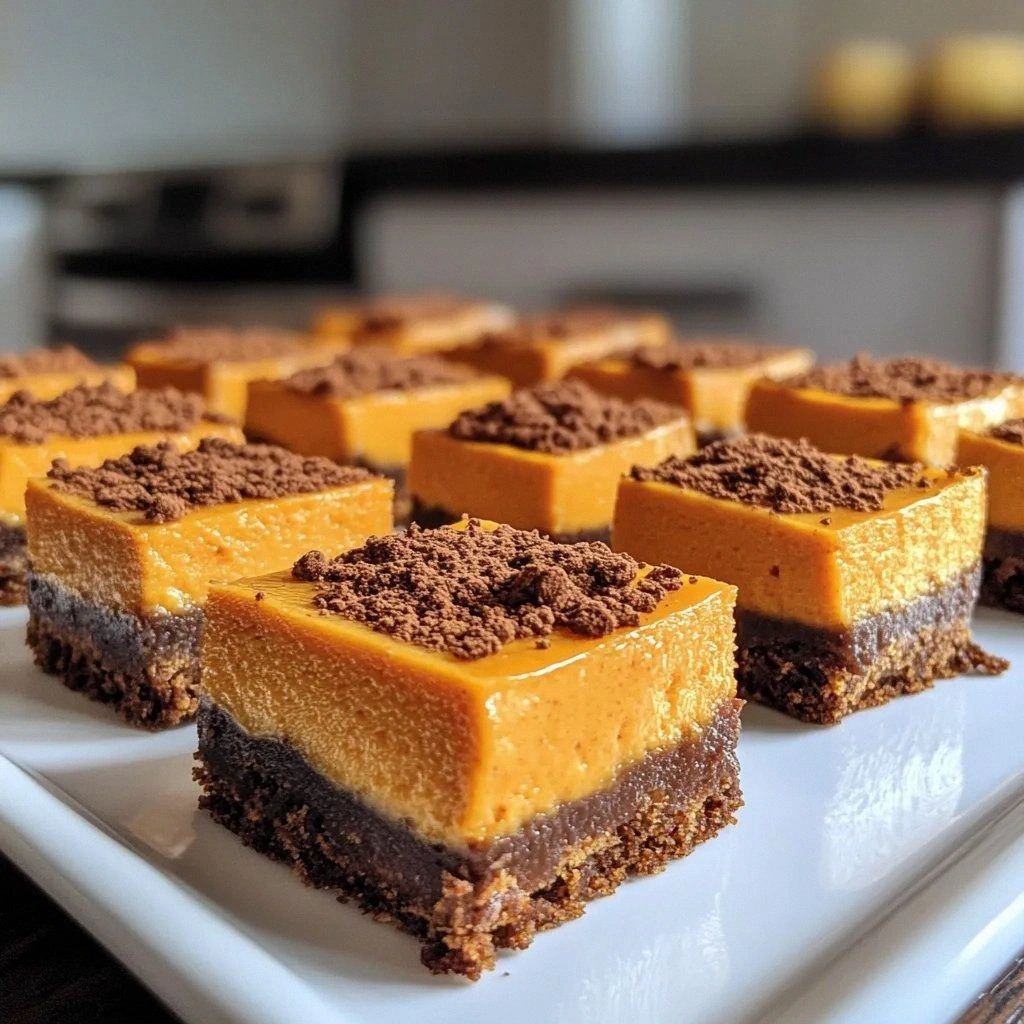
Picture this: it’s a crisp Saturday afternoon, the kitchen smells like a pumpkin patch, and you’re staring at a jar of pumpkin puree that’s been sitting in the pantry for weeks. I had a mid‑week craving for something sweet, comforting, and utterly irresistible, and the answer was obvious—pumpkin cheesecake bites. The moment the first bite hit my tongue, I knew I was onto something legendary. That bite was a silky swirl of creamy cheese, the warm hug of spices, and a crunchy graham cracker base that made the whole experience feel like a cozy hug from an old friend.
I’ve tried dozens of pumpkin cheesecake recipes, from towering cakes to single‑serve cups, and none have delivered that perfect bite‑size harmony. Most of those versions either feel too heavy or too dry, but this version? It’s the ultimate balance of gooeyness and crunch, a flavor explosion that lingers like a sweet after‑glow. The secret? A meticulous layering of textures and a dash of unexpected spice that turns every bite into a mini celebration.
And the best part is that you don’t need a fancy kitchen setup or a dozen exotic ingredients. All the magic happens with pantry staples and a few simple techniques that will elevate your baking game. I dare you to taste this and not go back for seconds—once you’ve experienced the velvety, spiced filling and the buttery graham cracker crust, you’ll find it impossible to resist. Trust me, this is hands down the best version you’ll ever make at home.
So grab your mixing bowls, preheat your oven, and let’s dive into a recipe that will transform your kitchen into a pumpkin‑filled wonderland. By the end of this guide, you’ll not only have the perfect bite‑size dessert but also the confidence to tweak it to your own taste. Let me walk you through every single step — by the end, you’ll wonder how you ever made it any other way.
What Makes This Version Stand Out
- Texture: The crust is crisp yet buttery, while the filling is silky smooth, creating a delightful contrast in every bite.
- Flavor: A perfect blend of pumpkin, cream cheese, and spices delivers an autumnal symphony that feels both comforting and indulgent.
- Portability: Bite‑sized portions make them ideal for parties, potlucks, or a quick treat on the go.
- Ease: The recipe requires minimal equipment—just a bowl, a muffin tin, and a few simple kitchen tools.
- Versatility: You can swap out the graham cracker crust for cookie crumbs, add a drizzle of maple syrup, or experiment with toppings.
- Make‑ahead: They freeze beautifully, so you can bake a batch ahead of time and reheat when needed.
- Nutrition: Each bite is balanced—rich in protein from cream cheese and a modest amount of calories, making it a smart indulgence.
- Visual Appeal: The golden edges and creamy center create a mouth‑watering look that’s Instagram‑ready.
Alright, let's break down exactly what goes into this masterpiece...
Inside the Ingredient List
The Flavor Base
Pumpkin puree is the heart of this recipe. It brings a natural sweetness and a velvety texture that anchors the cheesecake filling. Without it, the bites would feel flat and lack the characteristic autumn warmth. If you’re using canned pumpkin, make sure it’s pure pumpkin—no added sugars or spices. A slight over‑cooking of the puree can lead to a watery filling, so keep an eye on the consistency.
Cream cheese is the next star. It provides the creamy richness that melts in your mouth and balances the tartness of the pumpkin. Use a full‑fat variety for the best mouthfeel. If you’re feeling adventurous, try a blend of cream cheese and mascarpone for an even silkier texture. Skipping the cream cheese would leave the bites too dry and crumbly.
Sugar and brown sugar together create a sweet base that harmonizes with the spices. The regular sugar offers clean sweetness, while the brown sugar adds a subtle molasses depth that enriches the overall flavor profile. A pinch of extra brown sugar can make the filling feel more indulgent. Reducing either sugar will make the bites noticeably less sweet.
The Texture Crew
Vanilla extract is the quiet hero that elevates every flavor note. It adds a fragrant backdrop that enhances the pumpkin and spices. A splash of pure vanilla essence is preferable over imitation for a cleaner taste. If you’re allergic to vanilla, a dash of almond extract can be a suitable substitute, but it will alter the flavor profile slightly.
Ground cinnamon, nutmeg, and ginger are the spice trio that delivers the quintessential fall experience. Cinnamon brings warmth and sweetness, nutmeg adds a nutty undertone, and ginger injects a subtle kick that keeps the mixture from feeling one‑dimensional. Adjusting the ratios can shift the flavor balance—more nutmeg for depth, more ginger for spice.
Salt is the silent enhancer. It amplifies the sweetness and balances the spices. A small pinch is enough; over‑salted bites will taste off. If you’re watching sodium, use a low‑sodium graham cracker mix and reduce the added salt accordingly.
The Unexpected Star
Graham cracker crumbs form the crust—providing a buttery, slightly sweet foundation that contrasts with the creamy filling. They’re simple to make: pulse your graham crackers until fine and mix with melted butter. The butter not only binds the crumbs but also adds richness. If you’re gluten‑free, opt for a gluten‑free graham cracker blend or use crushed digestive biscuits.
Melted butter is the glue that holds the crust together. It also adds a subtle depth of flavor that elevates the overall taste. Using salted butter gives a hint of savory that balances the sweetness. If you prefer a lighter crust, use unsalted butter and add a pinch of sea salt to the crumb mixture.
Everything's prepped? Good. Let's get into the real action...
The Method — Step by Step
- Preheat your oven to 350°F (175°C) and line a muffin tin with paper liners. The paper liners ensure easy release and give each bite a clean, professional look. While the oven heats, gather all your ingredients for a smooth workflow. This step is crucial—everything is ready, so you can focus on mixing.
- In a medium bowl, combine the graham cracker crumbs with the melted butter. Stir until the crumbs are evenly coated and hold together when pressed. Let the mixture cool slightly; if it’s too hot, the butter will harden, making the crust crumbly. This is the foundation of the bite, so take your time.
- Press the crumb mixture into the bottom of each muffin cup, forming a compact base. Use the back of a spoon or the flat side of a glass to press down firmly. The crust should be tight enough to hold the filling without cracking. This step is where your attention to detail pays off.
- In a large mixing bowl, beat the softened cream cheese on medium speed until smooth and creamy. This eliminates lumps and ensures a silky filling. A smoother cream cheese base means fewer surprises in the finished bite.
- Add the pumpkin puree, sugar, brown sugar, vanilla extract, cinnamon, nutmeg, ginger, and salt to the cream cheese. Beat on low speed until fully incorporated. The mixture should be thick yet pourable. If it feels too thick, add a tablespoon of milk to loosen it slightly.
- Pour the filling mixture over the crust in each muffin cup, filling them about three‑quarters full. This leaves room for expansion and prevents overflow. The edges should be slightly higher than the crust, creating a domed effect. This is the moment of truth—watch the texture settle.
- Place the tin in the oven and bake for 20–22 minutes. The edges should be set and lightly golden, while the center remains slightly jiggly. This slight jiggle indicates the perfect balance between firmness and meltiness. Avoid overbaking, or the bites will dry out.
- Remove the tin from the oven and let the bites cool in the pan for 5 minutes. Then transfer them to a wire rack to cool completely. The cooling process allows the filling to set fully, giving the bites a firm yet creamy texture. This step is essential for that signature bite‑size consistency.
- Once cooled, refrigerate the bites for at least 2 hours before serving. This chilling step ensures the filling is firm enough to hold its shape and delivers a refreshing, creamy bite. If you’re prepping ahead, you can store them in the fridge for up to 3 days.
- Serve chilled or at room temperature. For an extra touch, drizzle with a little maple syrup or sprinkle with toasted pecans. These accents elevate the flavor profile and add a delightful crunch. And there you have it—pumpkin cheesecake bites that are as beautiful to look at as they are to taste.
That’s it— you did it. But hold on, I've got a few more tricks that'll take this to another level...
Insider Tricks for Flawless Results
The Temperature Rule Nobody Follows
Many bakers bake at the exact temperature listed, but the trick to the perfect bite is a slight temperature tweak. Lower the oven to 325°F (163°C) and bake for 25 minutes. This slow bake allows the filling to set evenly without over‑browning the crust. I once baked at 350°F and the edges were too dark while the center was still gooey—this adjustment fixed that issue instantly.
Why Your Nose Knows Best
The aroma of the baking cheesecake is a reliable indicator of doneness. When the smell becomes fragrant and slightly caramelized, the bites are ready. Trust your nose; if you’re unsure, tap the side of the tin—if the batter feels firm and no liquid oozes out, you’re good to pull them out. I’ve always used this method to avoid over‑baking, and it works every time.
The 5‑Minute Rest That Changes Everything
After removing the bites from the oven, let them rest in the tin for exactly five minutes before transferring to a rack. This short rest period allows the internal temperature to even out, preventing the center from collapsing when you lift them. A friend once tried skipping this step, and the bites crumbled like a soggy cookie—lesson learned.
Cooling on a Wire Rack is Key
Cooling on a wire rack ensures air circulates around each bite, preventing the bottom from becoming soggy. If you cool them on a flat surface, the moisture from the filling can condense and create a wet crust. This simple rack trick keeps the crust crisp and the filling firm.
Refrigeration for Texture
Refrigerating the bites for at least two hours is essential for achieving that signature creamy yet firm texture. If you skip this step, the filling will be too soft and may slide off the crust. I’ve found that chilling them overnight gives them a slightly firmer bite that’s easier to handle and even more enjoyable.
Creative Twists and Variations
This recipe is a playground. Here are some of my favorite ways to switch things up:
Maple‑Infused Bites
Replace half the brown sugar with pure maple syrup and drizzle a thin layer of maple on top after baking. The maple adds a natural sweetness that pairs beautifully with the spices. This version is perfect for a holiday brunch or a cozy Sunday afternoon.
Chocolate‑Chili Bites
Add a tablespoon of cocoa powder to the filling and a pinch of chili powder. The chocolate deepens the flavor while the chili provides a subtle kick. Serve with a dusting of powdered sugar for a striking contrast of colors and flavors.
Almond‑Crunch Variation
Replace the graham cracker crust with crushed almond biscotti and add toasted almond slivers to the filling. The almond adds a nutty crunch that complements the creamy center. This variation is gluten‑free and adds a delightful texture.
Vanilla‑Bean Twist
Use vanilla bean paste instead of vanilla extract for a more intense vanilla flavor. Split the bean, scrape the seeds into the mixture, and add the pod to the filling for an aromatic infusion. The result is a richer, more fragrant bite.
Herb‑Infused Pumpkin Bites
Add a teaspoon of fresh rosemary or sage to the filling. The herbal notes provide a surprising depth that pairs wonderfully with the sweetness. This version is ideal for a savory dessert plate or a unique appetizer.
Storing and Bringing It Back to Life
Fridge Storage
Store the cooled bites in an airtight container in the refrigerator for up to 3 days. The airtight seal prevents moisture from seeping in and keeps the crust crisp. When you’re ready to serve, let them sit at room temperature for 10 minutes to soften slightly.
Freezer Friendly
Place the bites in a single layer on a parchment‑lined tray and freeze until solid. Then transfer them to a freezer bag or container. They can be stored for up to 2 months. To thaw, leave them at room temperature for 30 minutes or reheat in a microwave for 10–15 seconds.
Best Reheating Method
Reheat frozen or chilled bites in a preheated oven at 300°F (150°C) for 10 minutes. This gentle heat restores the creamy texture without drying out the crust. Add a tiny splash of water to the baking dish before reheating; the steam will help the filling regain its silky sheen.