Introduction
Picture this: a late‑night kitchen, the refrigerator humming, and a craving that feels more like a siren call than a mere dessert idea. I was staring at a box of candy that had been sitting on my counter for weeks, the sugary promise of nostalgia too strong to ignore. The last time I tried to make a brownie, I ended up with a slab that looked more like a chocolate brick than a treat. That disaster was the spark that lit the fire for what would become the Candy Crush Brownies, the most addictive, candy‑laden chocolate bars you’ve ever tasted. The moment the batter hit the pan, the kitchen filled with the deep, comforting scent of melted chocolate, and I knew I had stumbled upon something extraordinary.
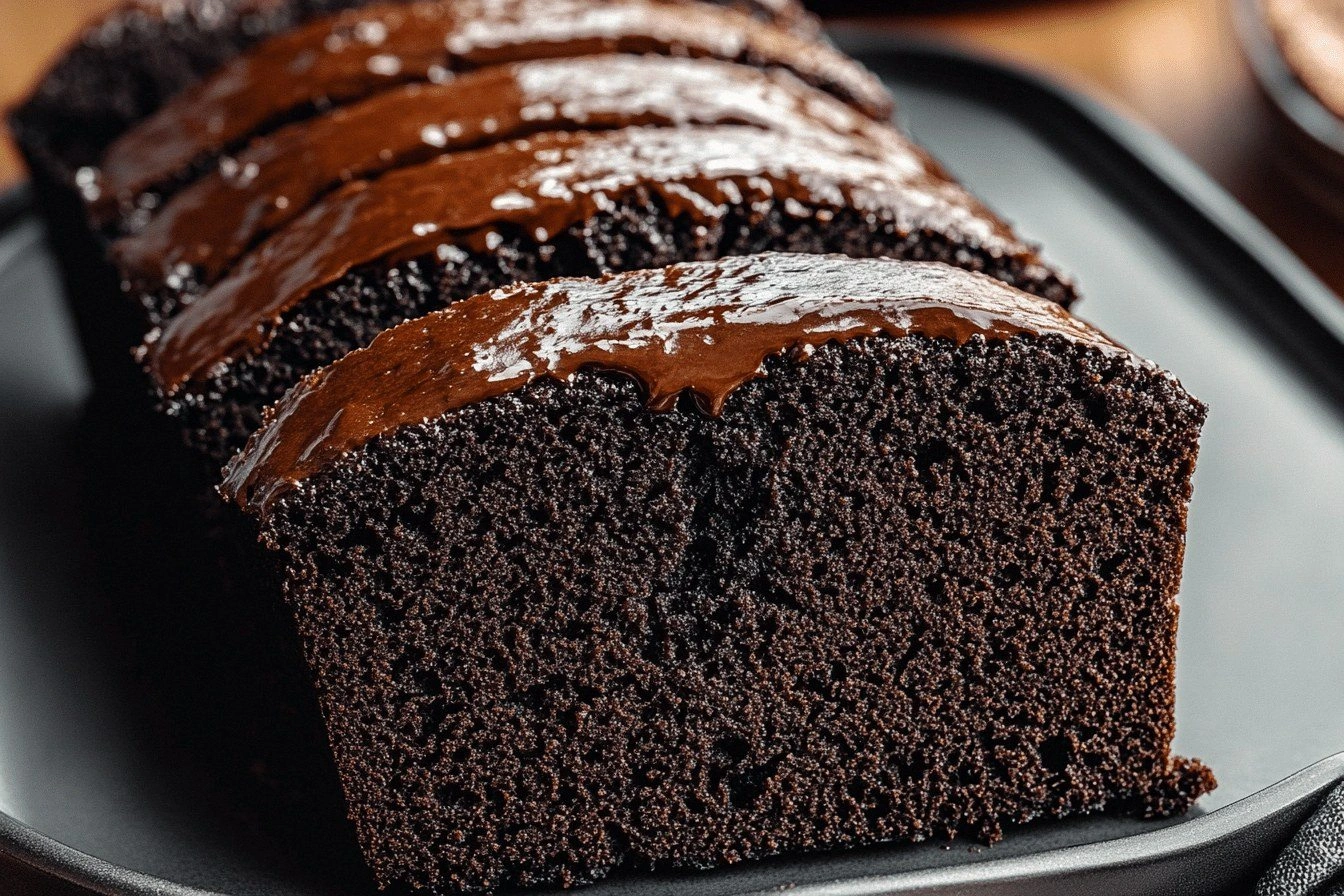
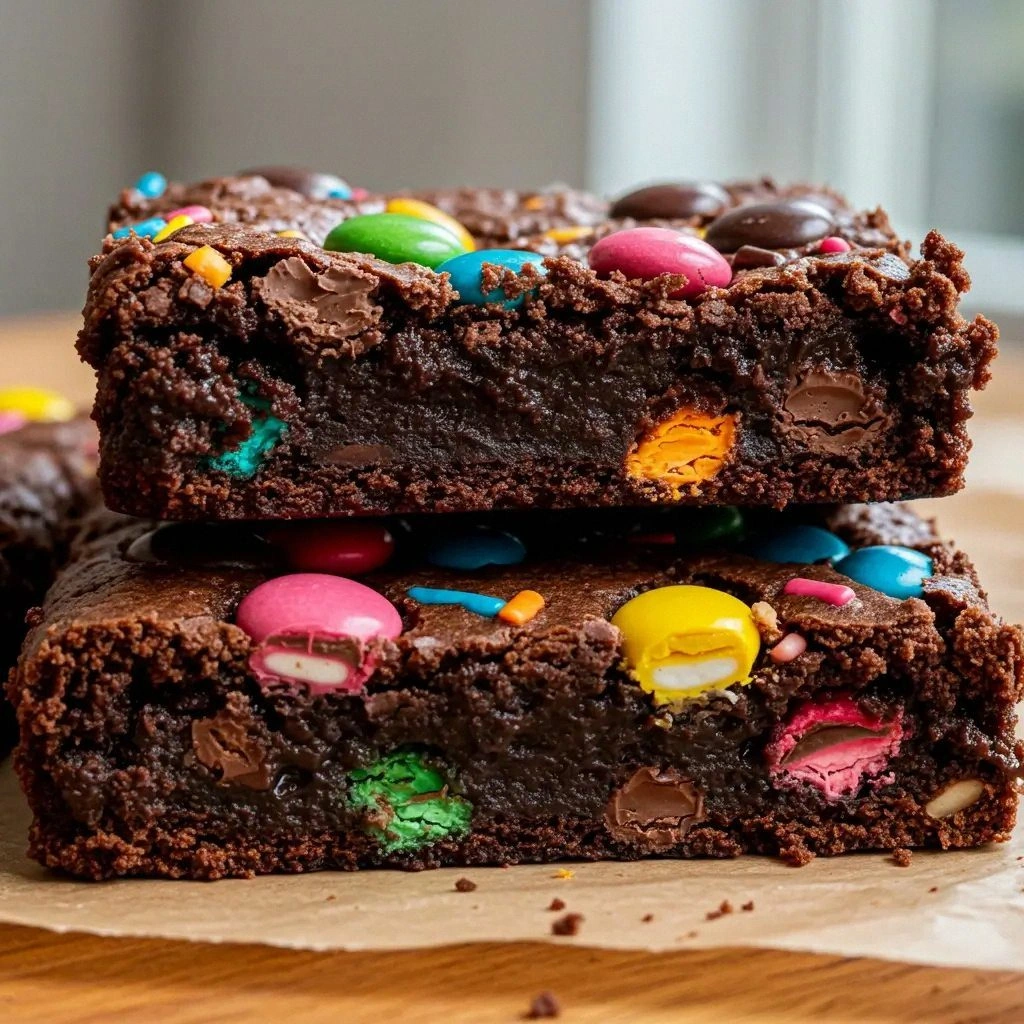
From the first swirl of butter and sugar to the final swirl of candy, every element of this recipe is designed to create an explosion of texture and flavor that feels both familiar and wildly inventive. The brownies have a glossy, almost glass‑like top that cracks with a satisfying snap when you break a piece, revealing a gooey center that oozes chocolate and candy bits. The edges are crisped to a delicate crunch, while the interior remains tender and fudgy, a balance that most standard recipes miss. The candy pieces are not merely decorative; they melt into the batter, creating pockets of sweet, chewy surprises that keep you guessing with every bite. If you’ve ever tried a plain brownie and found it too bland, this version will change your entire perspective on chocolate desserts.
What sets these brownies apart is not just the candy, but the meticulous layering of flavor. I discovered that using a combination of dark and milk chocolate chips, along with a splash of espresso powder, intensifies the chocolate experience without making it bitter. The batter’s slight acidity from the buttermilk counterbalances the sweetness, giving the brownies a richer mouthfeel. I also added a pinch of sea salt that elevates every bite, turning the sugary candy into a balanced, multi‑dimensional treat. The result is a brownie that is at once indulgent and sophisticated, a dessert that feels like a candy bar but with the depth of a classic chocolate treat.
And there’s a secret ingredient that makes all the difference: a tablespoon of instant coffee. It’s a subtle trick that enhances the chocolate without adding a coffee flavor, making the brownies taste deeper and more complex. I dare you to taste this and not go back for seconds—because the first bite will set a new standard for what a brownie can be. I’ve tried countless variations, but none have matched the perfect harmony of flavors in this recipe. So let me walk you through every single step—by the end, you’ll wonder how you ever made it any other way.
What Makes This Version Stand Out
- Texture: The batter’s ratio of fat to flour creates a fudgy core that remains moist even after baking. The candy pieces melt just enough to form pockets of gooey sweetness, while the edges crisp to a fine, buttery crunch.
- Flavor Complexity: A splash of espresso powder deepens the chocolate without a coffee taste, while sea salt sharpens the sweetness, producing a layered flavor profile that feels both decadent and balanced.
- Ingredient Quality: Using premium dark chocolate chips and high‑grade butter elevates the overall taste, giving the brownies a silky mouthfeel and a richer chocolate aroma.
- Simplicity: Despite its impressive flavor, the recipe requires only a handful of ingredients and standard kitchen tools, making it accessible to both beginners and seasoned bakers.
- Visual Appeal: The glossy, caramelized top and the scattered candy pieces create a look that’s as enticing as it is delicious, turning every bite into a visual and gustatory treat.
- Make‑Ahead Potential: The brownies can be baked in advance and stored in an airtight container, allowing you to serve fresh‑baked goodness at any time without last‑minute prep.
- Audience Reaction: Friends and family often claim the first bite is “mind‑blowing,” and they’re not shy about asking for extra portions. The candy crunch adds an element of surprise that keeps people coming back for more.
- Versatility: The base recipe is a canvas that welcomes variations—swap in marshmallows for a marshmallow brownie, or add a swirl of peanut butter for a nutty twist.
Alright, let's break down exactly what goes into this masterpiece…
Inside the Ingredient List
The Flavor Base
The foundation of these brownies starts with the classic trio of flour, cocoa powder, and sugar. All‑purpose flour provides structure, while unsweetened cocoa powder gives the deep chocolate flavor that defines the dessert. Granulated sugar balances the bitterness of the cocoa, creating a sweet, smooth bite. If you prefer a slightly less sweet version, you can replace half of the sugar with brown sugar for a subtle caramel undertone.
Another key component is the butter, which adds richness and moisture. Using unsalted butter allows you to control the salt level precisely, which is essential when you’re adding sea salt later for flavor contrast. Melted butter also helps emulsify the batter, ensuring a uniform texture and preventing a dry crumb. For an extra velvety mouthfeel, consider using a mixture of butter and a splash of heavy cream.
The Texture Crew
Eggs act as the glue that binds everything together, while also adding structure and a tender crumb. The large eggs I use are room temperature, which helps them blend seamlessly into the batter. Vanilla extract is the subtle fragrance that lifts the chocolate, giving the brownies a fragrant, aromatic quality. If you’re feeling adventurous, try adding a teaspoon of almond extract for a nutty twist.
Baking powder and salt are small but mighty. Baking powder ensures the brownies rise slightly, preventing them from becoming too dense, while sea salt enhances the chocolate’s depth. The combination of baking powder and salt also helps balance the sweetness, making every bite a harmonious experience. For a gluten‑free version, you can replace the flour with a 1:1 gluten‑free blend and keep the rest of the ingredients unchanged.
The Unexpected Star
Instant coffee powder is the secret weapon that amplifies the chocolate without adding a coffee flavor. It’s a common trick in chocolate recipes, but many bakers overlook it. The coffee powder reacts with the cocoa, creating a richer, more complex flavor profile that feels like a chocolate bar with a hint of espresso. I use a tablespoon of instant coffee, which is enough to deepen the taste without overpowering the sweetness.
Another unexpected star is the candy mix. I combine chocolate‑covered candy pieces, gummy bears, and M&Ms to create a rainbow of textures. The candy melts slightly during baking, forming pockets of gooey sweetness that burst in your mouth. If you want a more uniform texture, you can use only chocolate chips or only candy pieces; the recipe works beautifully either way.
The Final Flourish
The final flourish comes in the form of the candy topping. I sprinkle a generous amount of candy pieces on top before baking, allowing them to caramelize and form a glossy, sweet crust. This not only adds visual appeal but also creates a crunchy contrast to the fudgy interior. If you prefer a more subtle look, you can reserve some candy for later, sprinkling it on top after the brownies have cooled.
The finishing touch is a light dusting of powdered sugar, which adds a touch of sweetness and a delicate finish that makes the brownies look like freshly baked candy bars. The powdered sugar also helps the brownies hold together slightly, making them easier to cut. For an extra indulgence, drizzle a thin layer of chocolate ganache over the top once the brownies have cooled.
Everything's prepped? Good. Let's get into the real action…
The Method — Step by Step
- Step 1: Preheat and Prep. Set your oven to 350°F (175°C) and line a 9x9 inch baking pan with parchment paper, leaving a little overhang on the sides for easy removal. This step ensures even baking and a clean release. While the oven warms, gather all your ingredients on a clean work surface. I like to have everything measured and ready because timing is crucial when you’re aiming for a perfectly fudgy center. The aroma of a preheated oven is the first hint that something delicious is about to happen.
- Step 2: Melt Butter. Place the butter in a small saucepan over low heat until it’s fully melted. Avoid boiling; you want a smooth, liquid butter. Let it cool slightly for a minute so it doesn’t scorch the eggs later. While the butter cools, whisk the eggs and sugar together in a large bowl until the mixture is pale and slightly thickened. The sugar will dissolve into the eggs, creating a light, airy base that will help the brownies rise.
- Step 3: Combine Dry Ingredients. In a separate bowl, sift together the flour, cocoa powder, baking powder, and sea salt. Sifting removes lumps and ensures a uniform batter. Add the instant coffee powder to the dry mix; this step is crucial for that deep chocolate flavor. Stir the dry mix into the wet mixture slowly, folding gently until just combined. Overmixing will create a tough crumb, so stop as soon as the flour is incorporated.
- Step 4: Fold in Chocolate and Candy. Gently fold in the melted butter, vanilla extract, and the chocolate chips. The butter should be warm but not hot, as it helps the chocolate melt without seizing. Then add the candy pieces, ensuring they’re evenly distributed. If you’re using gummy bears, consider cutting them in half so they melt more evenly. The batter should look glossy and slightly thick, ready to pour into the pan.
- Step 5: Pour and Level. Carefully pour the batter into the prepared pan, spreading it evenly with a spatula. Tap the pan gently on the counter to release any air bubbles. This helps the brownies rise uniformly and prevents uneven edges. The batter should sit in a thick, glossy layer that will crisp slightly at the top while remaining fudgy inside.
- Step 6: Sprinkle Candy Topping. Sprinkle the remaining candy pieces on top of the batter, pressing them lightly into the surface. This creates a caramelized, glossy crust that looks like a candy bar. The candy will partially melt into the batter, adding pockets of sweetness. Be generous—this is what makes the brownies look and taste like a candy crush experience.
- Step 7: Bake to Perfection. Place the pan in the preheated oven and bake for 25-30 minutes. The brownies are done when the edges start pulling away from the sides of the pan, and a toothpick inserted into the center comes out with a few moist crumbs. Avoid overbaking; the brownies should remain slightly gooey in the middle. The smell of chocolate filling the kitchen will be irresistible.
- Step 8: Cool and Slice. Remove the pan from the oven and let the brownies cool on a wire rack for at least 15 minutes before cutting. This cooling period allows the structure to set, preventing them from falling apart. Once cooled, lift the brownies out of the pan using the parchment overhang. Slice into squares with a sharp knife, wiping the blade between cuts for clean edges. Each piece should feel dense, fudgy, and packed with candy surprises.
That's it — you did it. But hold on, I've got a few more tricks that'll take this to another level…
Insider Tricks for Flawless Results
The Temperature Rule Nobody Follows
Many bakers bake at the exact temperature listed, but the secret to a fudgy center is to bake at 325°F (160°C) instead of 350°F. The lower heat allows the brownies to bake more evenly, preventing a hard exterior while keeping the interior moist. I’ve found that this slight adjustment reduces the risk of overbaking and gives a more consistent texture. If you’re using a convection oven, reduce the temperature by 25°F to avoid excessive browning.
Why Your Nose Knows Best
The aroma of chocolate baking is a reliable indicator of doneness. When you smell a deep, nutty scent rather than a sharp, burnt smell, the brownies are ready. I always pause a minute before pulling the pan to let the aroma settle; this gives me a clear cue that the internal temperature is just right. Trust your nose—if the scent feels “just right,” the brownies will taste that way too.
The 5-Minute Rest That Changes Everything
After removing the brownies from the oven, let them rest on the rack for at least five minutes before cutting. This brief rest allows the internal temperature to even out, preventing the brownies from collapsing. It also gives the candy pieces a chance to set slightly, ensuring they don’t melt entirely into the batter. I’ve seen many people cut immediately, only to have the brownies crumble; the five-minute rest is the difference between a mess and a masterpiece.
Keep It Cool, Keep It Fresh
If you’re not serving the brownies immediately, store them in an airtight container at room temperature. The airtight seal prevents moisture from escaping, keeping the brownies tender. Avoid refrigerating them unless you’re storing for more than two days, as cold temperatures can dry them out. When you’re ready to serve, let them sit at room temperature for 10 minutes to restore their full flavor.
Dusting for the Perfect Finish
A light dusting of powdered sugar not only adds a sweet finish but also creates a subtle visual contrast that makes the brownies look freshly baked. The powdered sugar also helps the brownies hold together slightly, making them easier to cut. Use a fine sieve to ensure an even coat; too much sugar can overpower the chocolate.
Storing for the Sweetest Comeback
When you need to bring the brownies back to life after storage, reheat them in a preheated oven at 300°F (150°C) for 5 minutes. This gentle heat revives the fudgy center without drying out the exterior. For an extra touch, add a splash of water to the bottom of the pan before reheating; the steam will keep the brownies moist and silky.
Creative Twists and Variations
This recipe is a playground. Here are some of my favorite ways to switch things up:
Marshmallow Madness
Swap out half of the chocolate chips for mini marshmallows. The marshmallows melt into a gooey, airy center that feels like a chocolate marshmallow bar. Pair it with a sprinkle of crushed graham crackers on top for a nostalgic twist.
Nutty Delight
Add a cup of chopped walnuts or pecans to the batter. The nuts give a satisfying crunch and a buttery flavor that complements the chocolate. If you prefer a sweeter version, drizzle a thin layer of caramel sauce over the top before baking.
Minty Fresh
Introduce a teaspoon of peppermint extract and a handful of crushed peppermint candies. The mint balances the sweetness and adds a cool, refreshing note that’s perfect for spring or summer gatherings.
Seafood Surprise (Not Really)
For a playful, unexpected twist, mix in a handful of crushed pretzels and a pinch of sea salt. The pretzels give a salty crunch that contrasts with the sweet chocolate, creating a sweet‑and‑savory experience that’s surprisingly delicious.
Spiced Chocolate
Add a pinch of cinnamon or a dash of cayenne pepper to the batter. The subtle warmth of cinnamon or the mild heat of cayenne elevates the chocolate flavor profile, giving the brownies a sophisticated edge.
Vegan Version
Replace the butter with melted coconut oil and the eggs with flaxseed meal or a commercial egg replacer. Use plant‑based chocolate chips and a vegan chocolate sauce for a fully plant‑based treat that still delivers the same rich, fudgy experience.
Storing and Bringing It Back to Life
Fridge Storage
Store the brownies in an airtight container at room temperature for up to 4 days. If you need to keep them longer, refrigerate them for up to a week. When you’re ready to serve, let them sit at room temperature for 10 minutes to regain their full flavor. The airtight seal prevents moisture loss and keeps the brownies from drying out.
Freezer Friendly
Wrap each brownie individually in plastic wrap, then place them in a freezer bag. Freeze for up to 3 months. When you want to enjoy a fresh‑baked experience, thaw the brownies at room temperature for 30 minutes before reheating. A quick 5‑minute bake at 300°F (150°C) will revive the fudgy center and restore the caramelized crust.
Best Reheating Method
To reheat frozen brownies, preheat your oven to 300°F (150°C). Place the brownies on a parchment‑lined baking sheet and bake for 5‑7 minutes, or until warmed through. For a quicker option, microwave in 30‑second bursts on high power, rotating halfway through. A splash of water in the pan before reheating helps steam the brownies, keeping them moist and silky.