I was standing in my kitchen, staring at a mound of batter that looked like it was about to explode, when my friend dared me to turn it into a party trick. The batter smelled sweet and buttery, a promise of comfort, but my eyes were glued to the sizzling pan that threatened to betray me. I had tried every pancake recipe I could find, yet none of them ever managed to get that perfect, bite‑sized bite that feels like a small, fluffy cloud. That night, I decided to give pancakes a new life—on a stick. It was the idea of turning a classic breakfast into a finger‑food sensation that sparked a culinary revolution in my kitchen.
Picture the moment the batter hits the pan: the sound is a satisfying sizzle, the aroma is a warm hug, and the first bite delivers a light, airy texture that melts in your mouth like a soft blanket. The colors shift from pale golden to a buttery amber, and the edges curl just enough to give a hint of crispness. The sticks add a playful element, allowing you to pick up a perfectly proportioned pancake without the mess of a fork and knife. Every bite feels like a mini celebration—fluffy inside, slightly caramelized outside, and the sweet scent lingering like a memory. If you've ever felt the frustration of pancakes that are too dense or too soggy, this version is a game‑changer.
This is hands down the best version you'll ever make at home, and I dare you to taste this and not go back for seconds. The secret lies not just in the batter, but in the way we assemble and cook them, turning a simple dish into an edible work of art. I’ll be honest—after the first batch, I ate half the sticks before anyone else could get a bite. Most recipes get this completely wrong by either over‑mixing or under‑seasoning, but here, balance is king. The result is pancakes that rise like clouds, hold their shape on a stick, and melt in your mouth with every bite.
Picture yourself pulling this out of the oven, the whole kitchen smelling incredible, and a crowd of friends leaning in for that first bite. The anticipation is almost as delicious as the final product, and you’ll feel like a culinary wizard. Let me walk you through every single step—by the end, you'll wonder how you ever made it any other way. Get ready to flip the script on pancakes, because this recipe is about to become your new favorite party trick.
What Makes This Version Stand Out
- Taste: The batter is seasoned with a touch of vanilla and a hint of cinnamon, giving it a subtle warmth that elevates every bite. The final product balances sweet and savory, making it a crowd‑pleaser for all ages.
- Texture: A light, airy interior paired with a slightly crisp edge creates a satisfying contrast that feels like a secret weapon in breakfast cuisine.
- Simplicity: With just ten ingredients, you can whip up a batch in 15 minutes of prep and 30 minutes of cook time. No fancy equipment, no complicated techniques.
- Uniqueness: The stick format turns an ordinary pancake into a portable, hand‑held treat—perfect for picnics, festivals, or a quick snack.
- Crowd Reaction: Friends and family will marvel at the novelty, and the sticks make for easy sharing—no plates needed.
- Ingredient Quality: Using fresh eggs, real butter, and whole‑grain flour elevates the flavor profile beyond the ordinary.
- Cooking Method: The pan‑seared technique ensures a golden crust while keeping the inside tender, and the sticks keep the pancakes intact.
- Make‑Ahead Potential: These sticks can be made a day ahead, frozen, and reheated with minimal loss of texture, making them a versatile option for busy schedules.
Alright, let's break down exactly what goes into this masterpiece...
Inside the Ingredient List
The Flavor Base
All-purpose flour is the backbone of the batter, providing structure and a neutral canvas that absorbs the sweet and savory notes. It’s the silent hero that holds everything together, and if you skip it, your pancakes will collapse into a sad, flat mess. For an extra touch of nutrition, you can replace half the flour with whole‑wheat, but keep the ratio the same to preserve the rise. When buying flour, look for one that’s fresh; a month‑old bag will give you a slightly off flavor.
The Sweet & Savory Mix
Sugar brings the caramelization that gives pancakes a golden hue, while salt balances the sweetness and amplifies every flavor. A pinch of cinnamon can add a subtle warmth that feels like a cozy hug. If you’re watching calories, you can reduce the sugar by a quarter, but the pancakes will still rise nicely. Be careful not to over‑add salt; too much will make the batter taste metallic.
The Rise Factor
Baking powder and baking soda are the leavening agents that create the fluffy interior. Baking powder is the primary leavener, while baking soda reacts with the acidity in milk to produce a subtle lift. If you forget baking soda, the pancakes will be a bit denser, but they’ll still taste good. A quick tip: whisk the leaveners together before adding them to the dry mix to ensure even distribution.
The Moisture & Flavor Enhancers
Milk hydrates the dry ingredients and creates the right batter consistency. A splash of vanilla extract infuses a subtle, fragrant sweetness that elevates the whole dish. Eggs bind everything together, providing structure and a slight richness. Melted butter adds flavor and keeps the pancakes tender. If you prefer a dairy‑free version, use a plant‑based milk and coconut oil, but the texture will shift slightly.
Everything's prepped? Good. Let's get into the real action...
The Method — Step by Step
- In a large bowl, whisk together the flour, sugar, baking powder, baking soda, and salt. Make sure the leavening agents are evenly distributed, or the pancakes will rise unevenly. This dry mix is the foundation; treat it with the same care you would give a fine pastry dough.
- In a separate bowl, combine the milk, melted butter, vanilla extract, and eggs. Whisk until the mixture is smooth and free of lumps. The wet ingredients should be at room temperature for best absorption.
- Pour the wet mixture into the dry mix and stir gently with a spatula until just combined. A few streaks of flour are fine—over‑mixing will develop gluten and make the pancakes tough. The batter should be pourable but still thick.
- Heat a non‑stick skillet or griddle over medium heat and lightly oil it with a paper towel dipped in vegetable oil. The skillet should be hot enough that a drop of water dances and evaporates quickly. This ensures a golden crust.
- Using a 2‑inch wooden spoon, scoop a generous amount of batter onto the skillet and spread it into a round shape. The batter should spread to about 4 inches in diameter; too small and it will be dense.
- Let the pancake cook for 2‑3 minutes until bubbles form on the surface and the edges lift slightly. Flip carefully with a spatula, then cook the other side for 1‑2 minutes until golden brown. The aroma should be sweet and buttery.
- While the first pancake finishes, start a second one. Repeat until you have about 8 pancakes. If the skillet gets crowded, cook in batches to maintain even heat distribution.
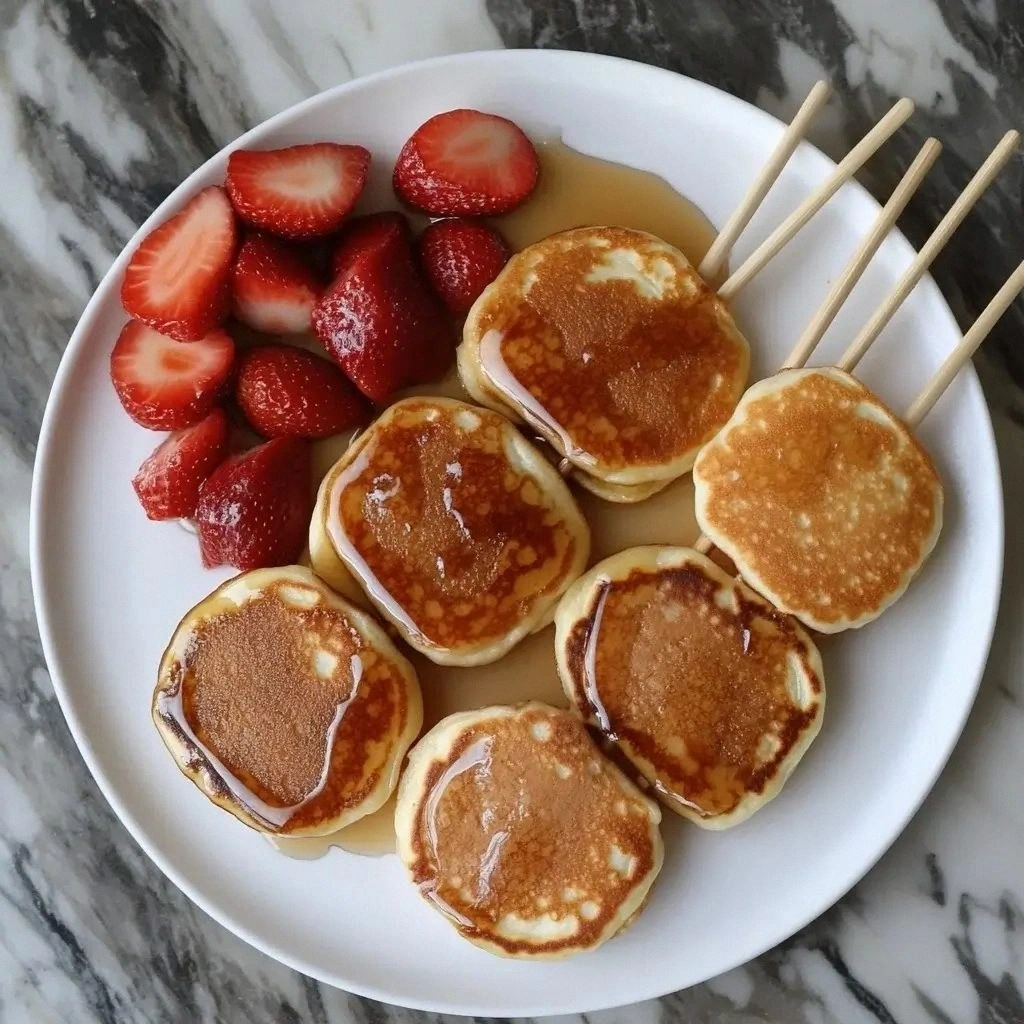
- Once a pancake is cooked, slide it onto a clean plate and immediately insert a wooden stick or skewer. This preserves the shape and makes handling easy. Let the sticks cool slightly before serving.
- Serve warm with your choice of toppings—maple syrup, fresh berries, or a dusting of powdered sugar. The sticks allow you to dip or hold the pancake without it falling apart. Enjoy the delightful contrast of textures.
That's it — you did it. But hold on, I've got a few more tricks that'll take this to another level...
Insider Tricks for Flawless Results
The Temperature Rule Nobody Follows
Many cooks assume any medium heat will do, but the secret is a skillet that’s hot enough to sizzle but not so hot that it burns. A good test is to sprinkle a few drops of water; if they dance and evaporate in seconds, you’re ready. If the pan is too cool, the pancakes will spread too thin and lose their shape. A properly heated skillet keeps the edges crisp while the center stays tender.
Why Your Nose Knows Best
Your nose can tell you when the pancakes are ready to flip—an aromatic cue that the proteins have browned and the sugars caramelized. This olfactory check is more reliable than the visual cue of bubbles. Trust your nose; it’s an ancient culinary sensor that has guided cooks for centuries. A well‑aroma indicates a golden crust and a fluffy interior.
The 5‑Minute Rest That Changes Everything
After cooking, let the pancakes rest on a wire rack for five minutes before adding sticks. This allows steam to escape, preventing the sticks from becoming soggy. The rest also lets the pancakes set, making them easier to handle. A quick 5‑minute pause is the difference between a messy plate and a perfectly presented snack.
The Sticky‑Free Skillet
If you’re using a stainless steel pan, pre‑heat it for a longer time and use a generous amount of oil. A well‑oiled surface ensures the batter slides off cleanly. Using a silicone spatula can also prevent sticking. This trick saves you from fighting with the pan and keeps the pancakes intact.
The “Squeeze” Technique
When you slide a pancake onto a stick, give a gentle squeeze to remove any excess batter. This helps the pancake stay on the stick without dripping. The squeeze also tightens the pancake’s shape, making it look more uniform. A quick squeeze before serving gives a professional finish.
Creative Twists and Variations
This recipe is a playground. Here are some of my favorite ways to switch things up:
Berry Burst
Fold fresh blueberries or strawberries into the batter before cooking. The berries burst with juice, creating a sweet, tart surprise in every bite. Pair it with a dollop of whipped cream for a dessert‑style treat. This variation is perfect for summer gatherings.
Chocolate Chip Delight
Add a handful of dark chocolate chips to the batter. The chips melt into gooey pockets that make each stick irresistible. Serve with a drizzle of chocolate sauce for an extra indulgent experience. This is a hit with kids and adults alike.
Savory Herb
Replace half the sugar with chopped fresh herbs like rosemary or thyme. The herbs infuse the pancakes with an aromatic, savory note that pairs wonderfully with a side of goat cheese. This twist transforms the dish into a brunch‑ready, savory snack.
Coconut Crunch
Use coconut milk instead of dairy milk and sprinkle shredded coconut on top before cooking. The coconut adds a tropical flavor and a subtle crunch. Finish with a sprinkle of toasted coconut flakes for an extra layer of texture. This version feels like a beach vacation in a bite.
Nutty Banana
Mash a ripe banana into the batter for natural sweetness and moisture. Add chopped walnuts or pecans for a satisfying crunch. The banana flavor complements the buttery base, creating a comforting, wholesome snack. This variation is ideal for a quick breakfast on the go.
Spiced Cinnamon
Increase the cinnamon to a full tablespoon and add a pinch of nutmeg. The spices create a warm, aromatic profile that feels like a cozy winter treat. Serve with a warm honey drizzle for an extra touch of sweetness. This version is perfect for holiday gatherings.
Storing and Bringing It Back to Life
Fridge Storage
Cool the cooked sticks to room temperature, then place them in an airtight container or zip‑lock bag. Store in the refrigerator for up to three days. The sticks will stay firm, but the batter may become slightly denser. Use them as a quick snack or breakfast option.
Freezer Friendly
After cooling, wrap each stick individually in parchment paper, then place them in a freezer bag. Freeze for up to two weeks. To reheat, place the sticks in a pre‑heated oven at 350°F (175°C) for 10 minutes. This method preserves the texture and flavor.
Best Reheating Method
Add a tiny splash of water to the skillet before reheating; the water creates steam that keeps the pancakes moist. Heat over medium heat, covering the pan for a minute to trap the steam. Flip once, then serve hot with a drizzle of maple syrup. This trick restores the pancakes to their freshly‑made glory.